How to Add & Swap Assets with Your Ledger

⬆️ Level up your crypto experience with the full Guide:
- How to set up your Ledger
- How to back up and store your Ledger
- How to add and swap assets with your Ledger (👈 you are here)
- How to stake ETH with your Ledger
- How to use DeFi & NFTs with your Ledger
- Troubleshooting & FAQ
How to Add & Swap Assets with Your Ledger
By this point, you should have already unboxed your Ledger hardware wallet, downloaded the Ledger Live app on your PC and/or mobile device, completed setup for your Ledger wallet, and secured your secret recovery phrase.
If you still need to complete any of these steps, go back to a previous article in this series, How to Set Up a Ledger. If you’re still unsure about security, please review How to Back Up and Store your Ledger.
If those steps are covered, let’s jump in!
Fund Your Wallet
If you already have crypto, you can simply transfer it to your Ledger using the public key for that particular account.
For most, this will be the easiest way to get started using your wallet and Ledger Live. However, you may hold crypto assets in a custodial account that doesn’t support withdrawals (at the time of writing, Robinhood and Paypal are examples of custodians not supporting crypto withdrawals).
In that case, it may be easier to simply purchase cryptocurrency through Ledger Live. We’ll review the purchase options in a bit, but first, let’s consider transfers.
Transferring assets into your Ledger
Let’s go through the process of adding crypto from a custodial exchange or crypto banks such as Coinbase or Gemini.
Step 1: Ensure the app for the coin you wish to top-up is downloaded onto your ledger.
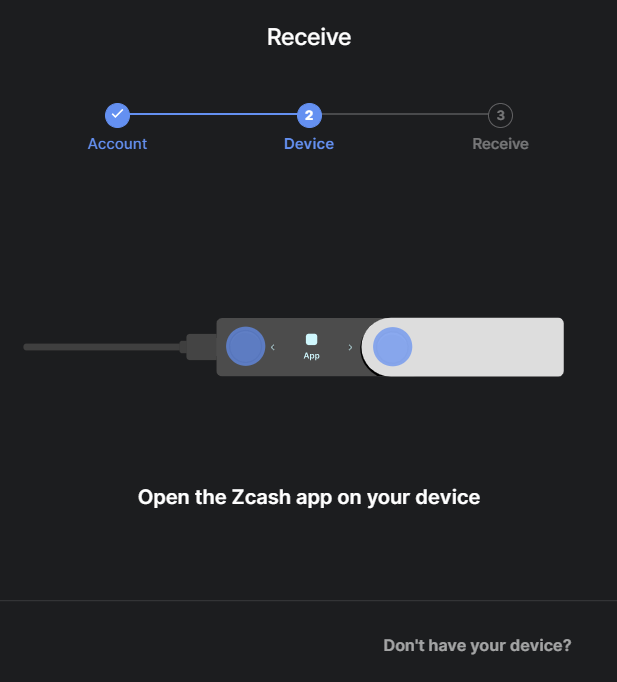
Open Ledger Live and connect your Ledger hardware wallet to your device running Ledger Live. Unlock the wallet with your PIN, and press both buttons to allow Ledger Live to access the wallet.
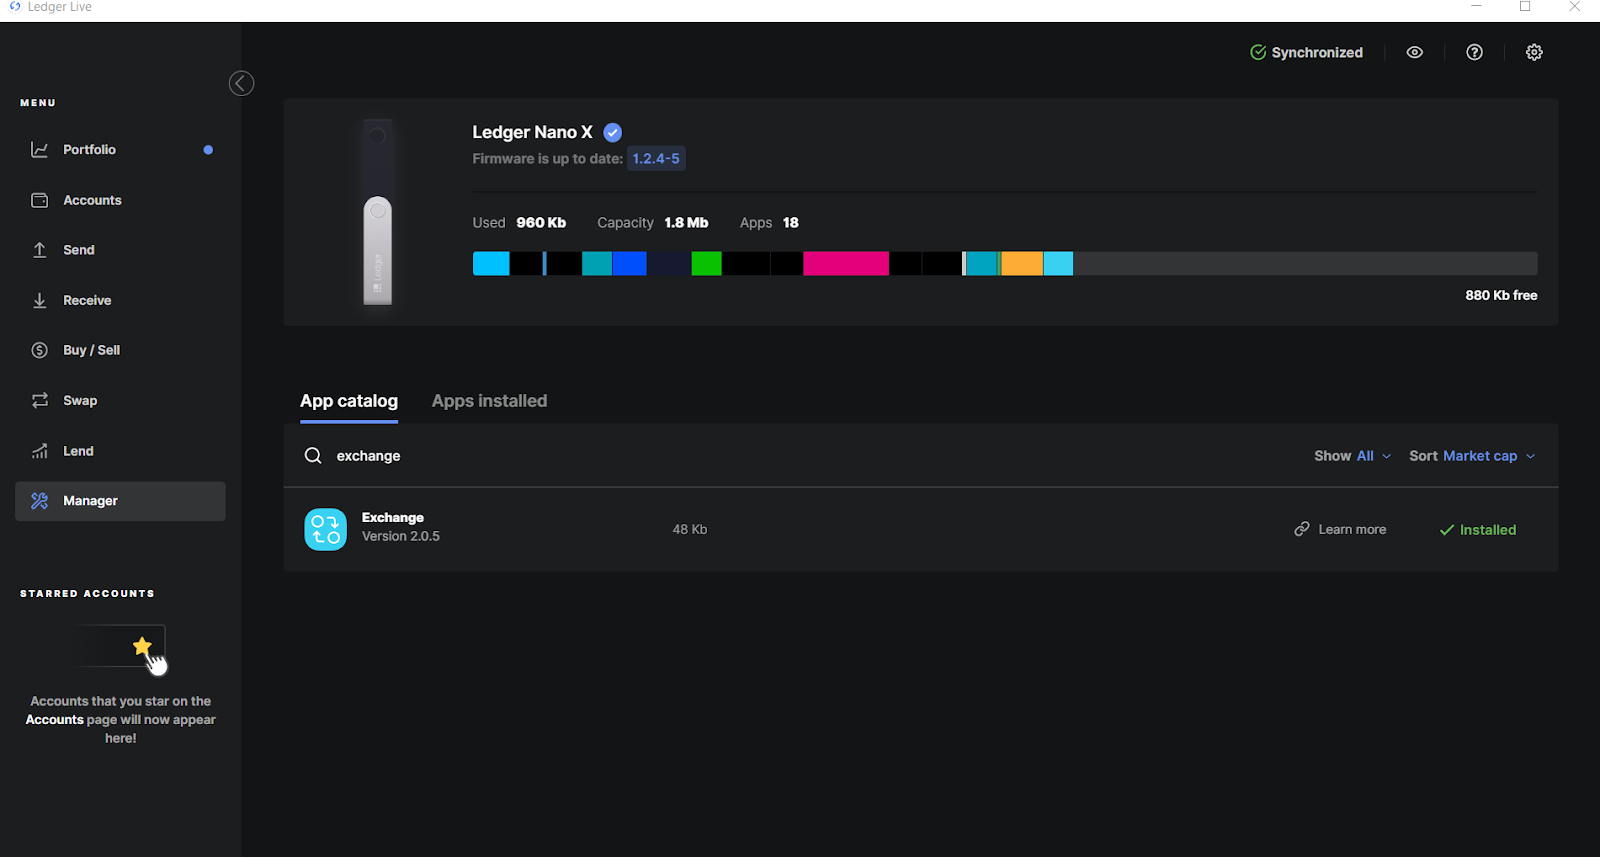
Go to the Manager tab to view the apps that are downloaded onto your device.
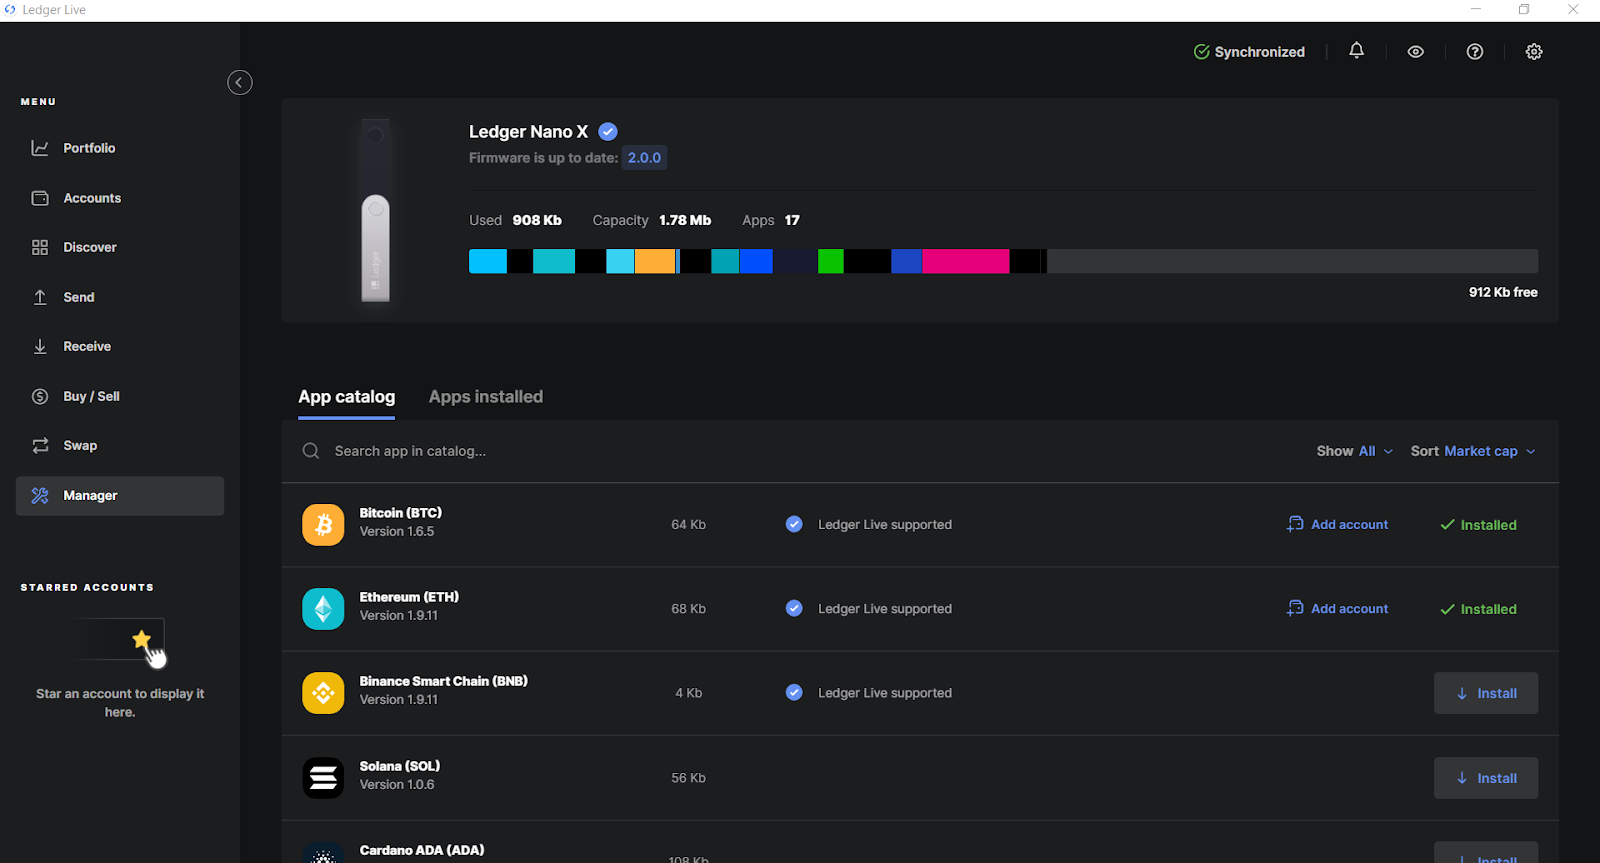
Scroll down through the App Catalog and find the crypto asset you wish to add, then click the Install button on the right side of the page.
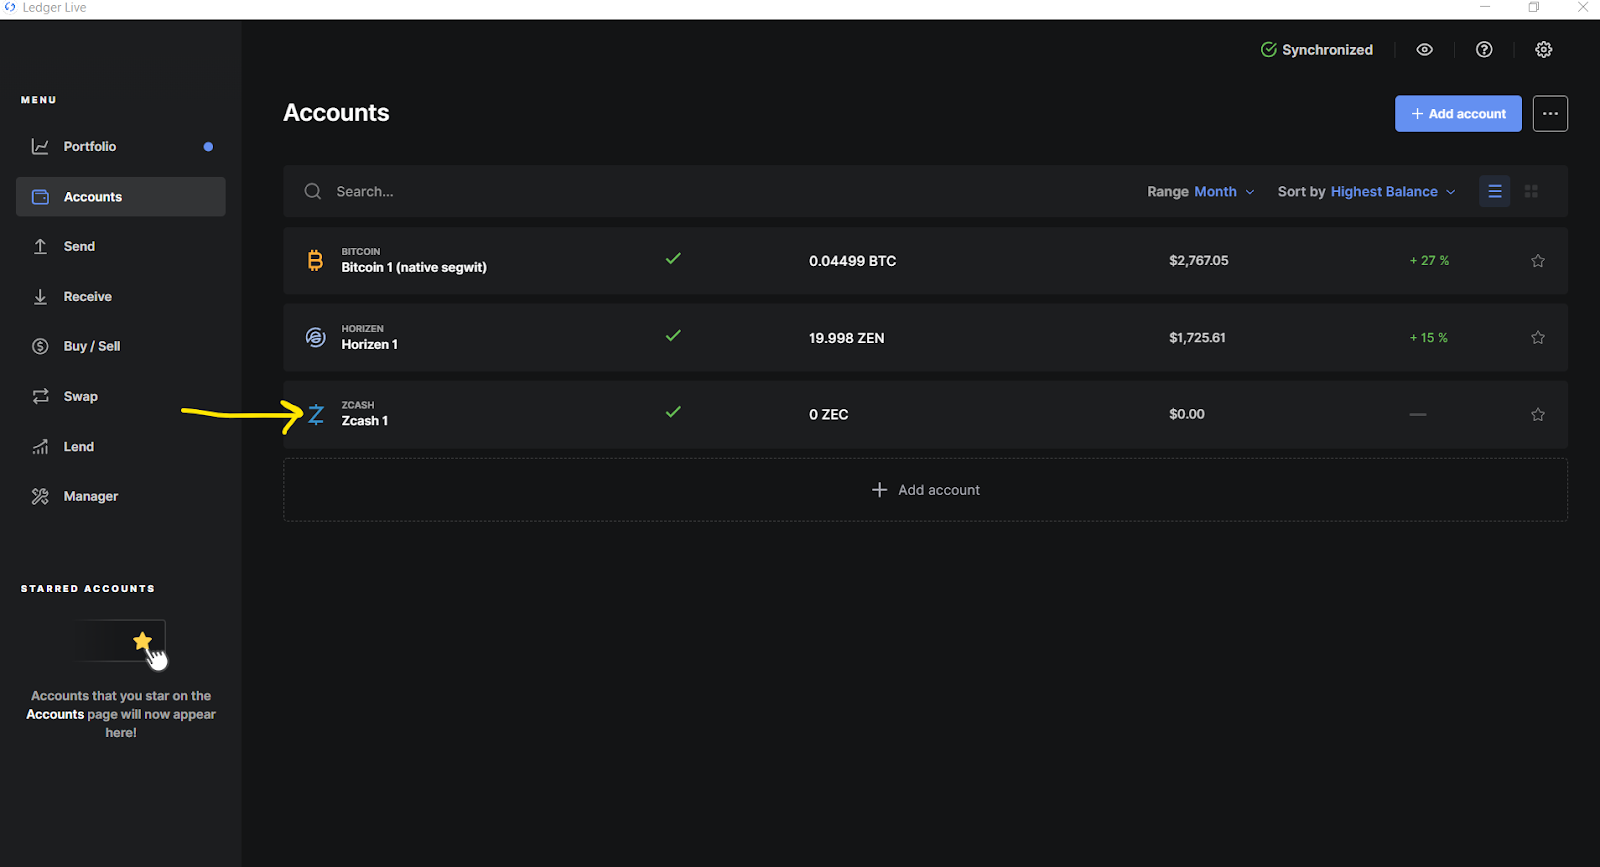
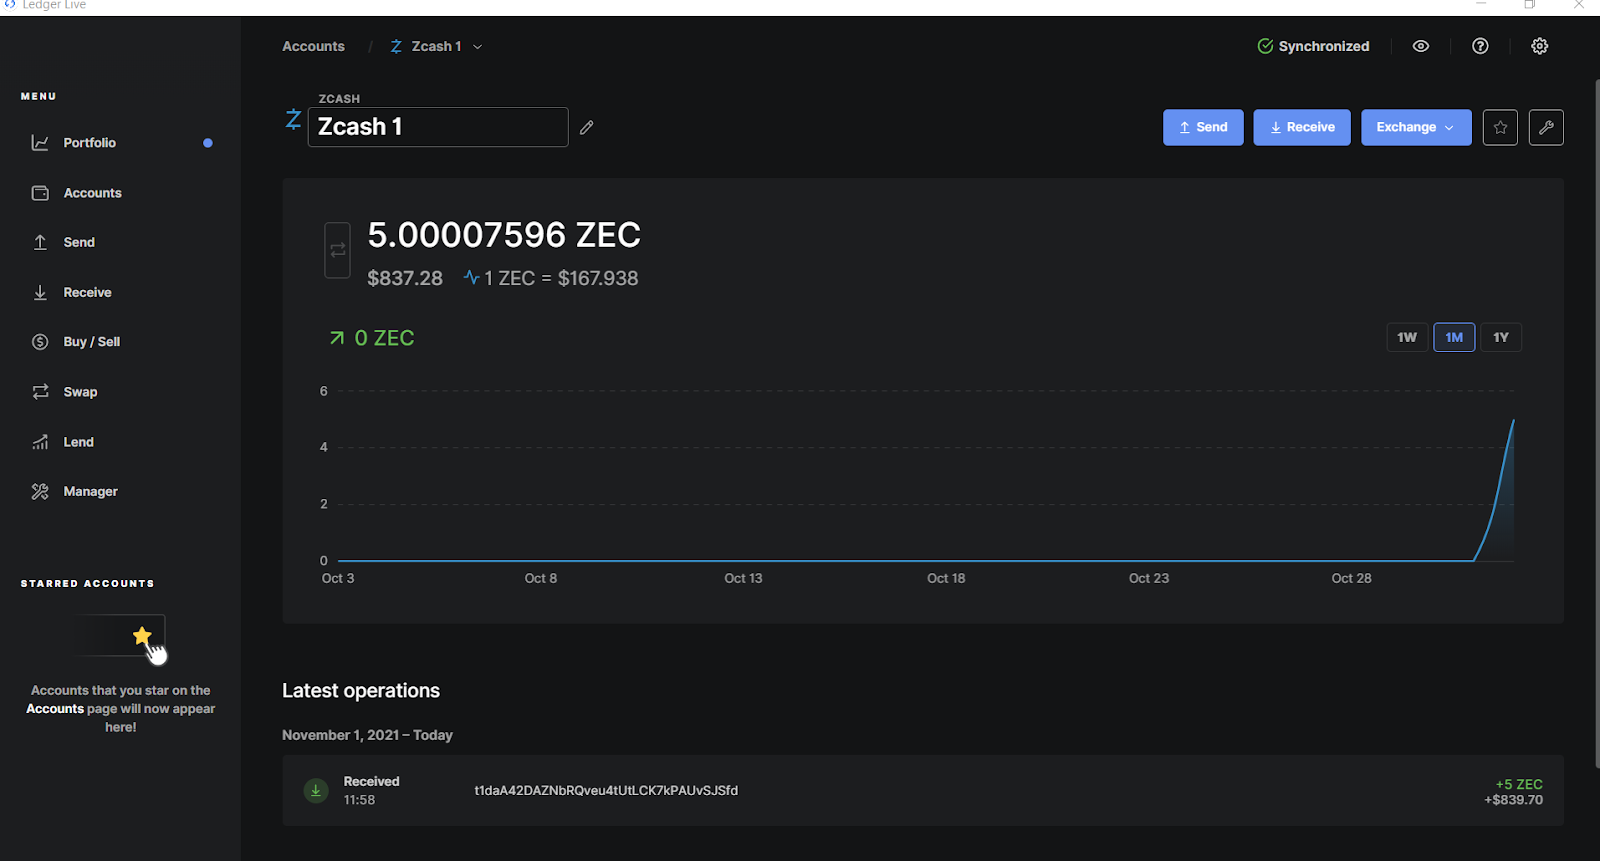
For this example, I’ll send some Zcash (ZEC) to my Ledger Nano X.
Take note of whether the row showing your preferred crypto has the blue checkmark that says “Ledger Live supported”. This means you will be able to transfer (and sometimes, even swap or stake) this coin directly within Ledger Live.
If it’s not supported but there is a Ledger app available, your hardware wallet can still store your keys, but you will need an accompanying software wallet application made specifically for that crypto in order to perform these functions.
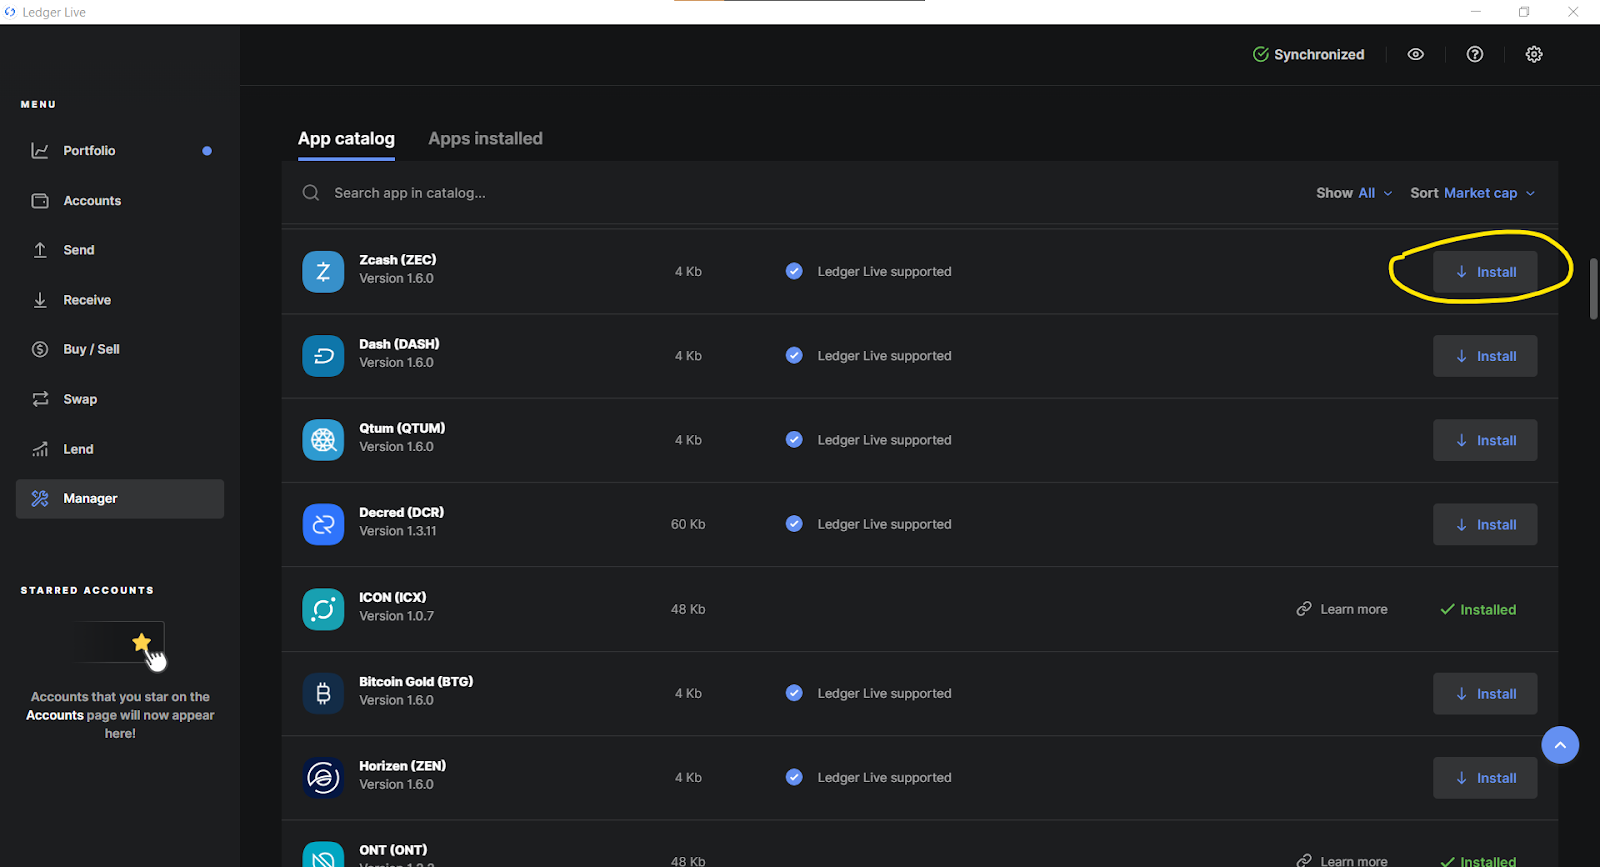
Having the Ethereum app will also allow you to manage any Ethereum-based ERC-20 token or ERC-721 nonfungible tokens (NFTs), so it will be a must-add in order to hold DeFi tokens or valuable NFTs in your wallet. If you’d like to verify the status of any particular coin or token, Ledger maintains a current listing of all their supported assets on this site.
Click the Install button to download the app onto your Ledger.
If your wallet has gone to sleep, you will need to re-enter your PIN before doing this. Once the app is installed, it should look like this:
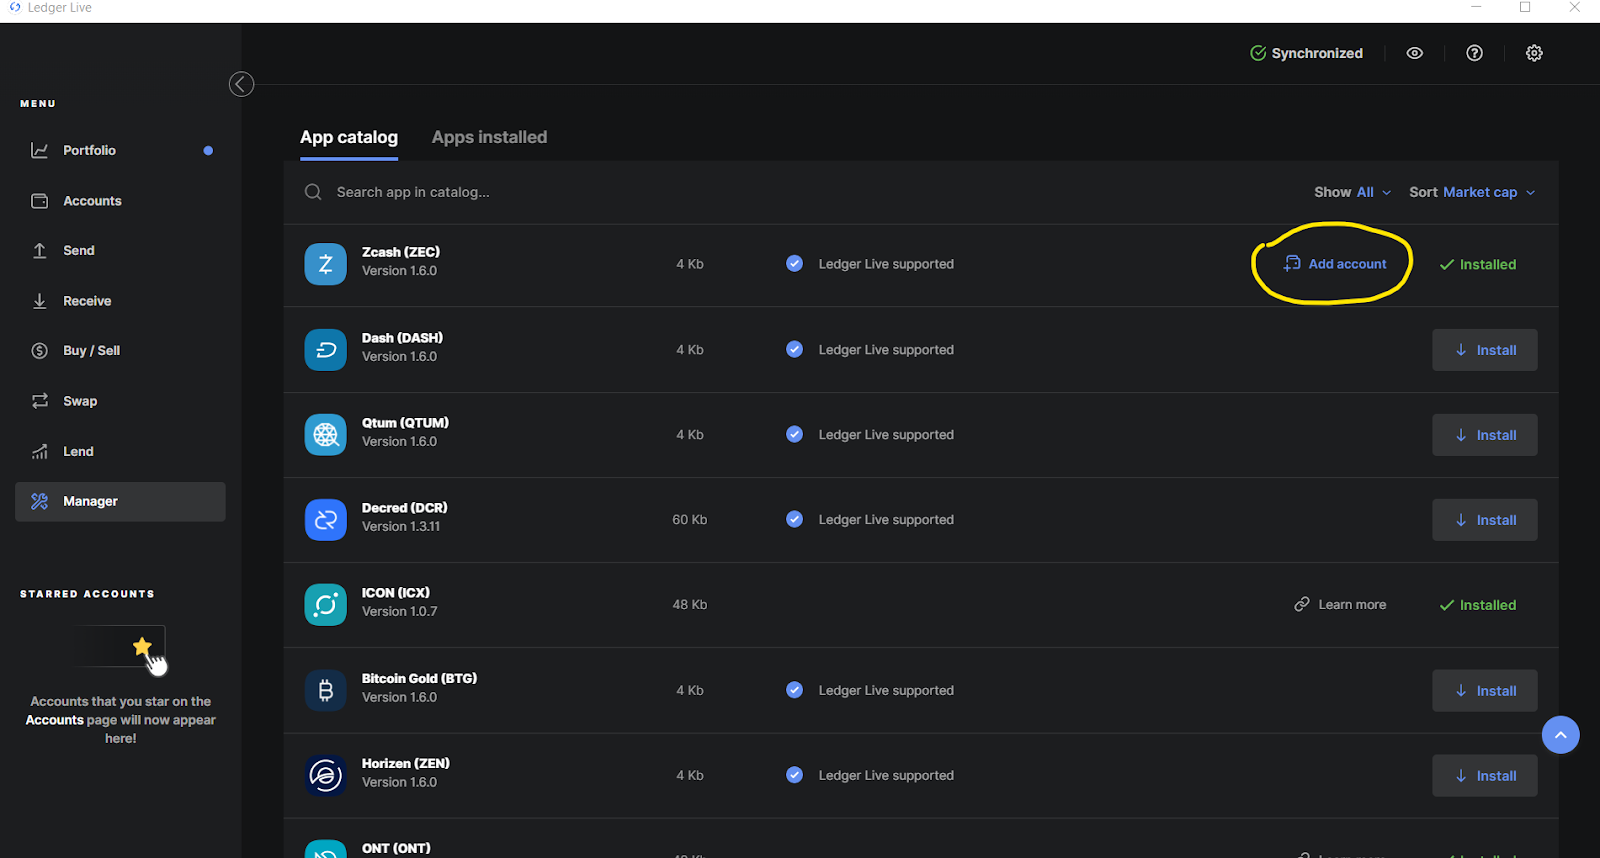
Step 2: Create an account for that asset on Ledger Live
If successful, you should see that the Install button is now a green checkmark saying “Installed”, and a new blue link appears to the left of it saying “Add account”. Click this to add an account for the asset whose app you just installed.
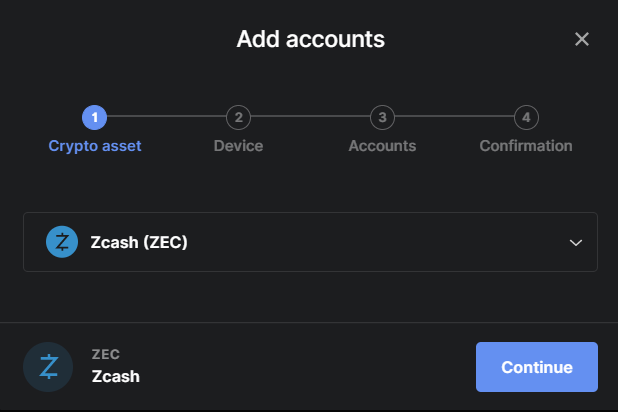
A smaller window will pop up. Check that the asset shown is the one for which you want to add the account and click Continue.
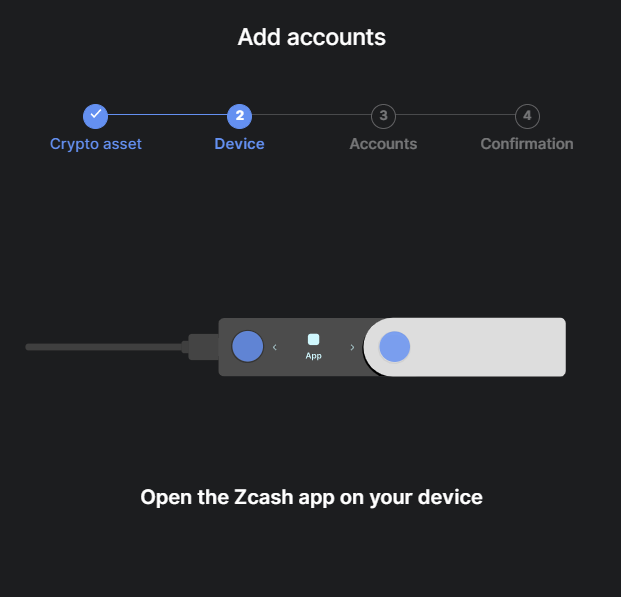
Click both buttons on your Ledger device to sign the action if the request to open the app is shown. (Remember, any time the hardware wallet times out or shows a screensaver animation, you will need to enter your PIN first.)
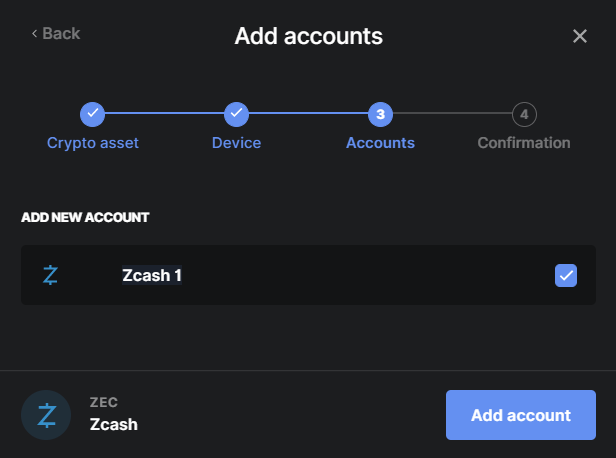
Enter the preferred name for your account and click the “Add account” button.
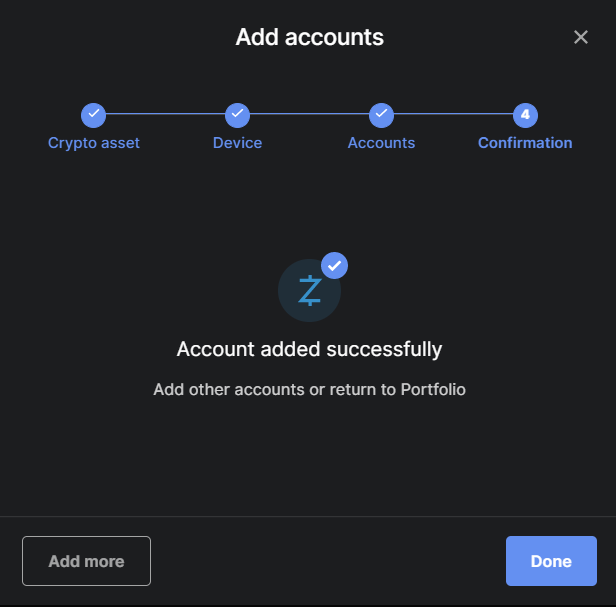
Now that your account is added, you can retrieve your public key address to tell your crypto bank or exchange where to send the asset. Click “Done” and Ledger Live will show you the new account in your Accounts tab.
Step 3: Obtain your newly created public key address and use it to withdraw that asset to your Ledger.
In Ledger Live, click the Receive tab on the left-hand side and a smaller window will pop up. Choose the account you wish to credit, and click the Continue button.
Click both buttons on your Ledger to confirm that you wish to open the app, and enjoy the satisfying tactile feedback of the Ledger buttons clicking under your thumbs.
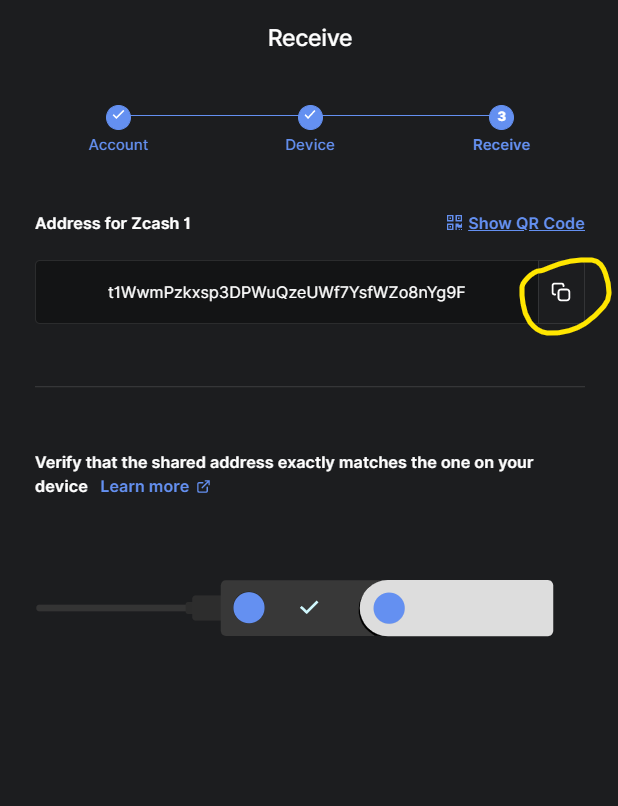
On this third screen, you will see the public key displayed, and clicking the copy symbol circled above will copy the data to your device’s clipboard for pasting into your exchange’s withdrawal form. If you are withdrawing from an account you access from mobile, you can click “Show QR Code” to display a two-dimensional barcode which can be scanned to retrieve the address on your mobile exchange app.
Once you have copied the address, go ahead and confirm on your hardware wallet by clicking both buttons if the wallet displays the correct address.
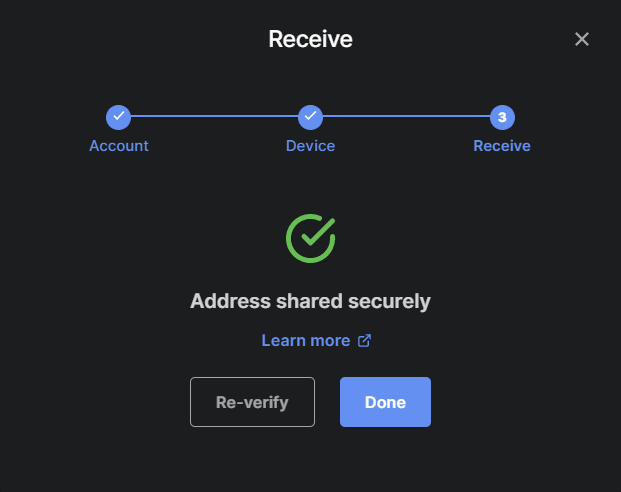
The public key has now been shared with your Ledger and you are ready to receive funds at that address. If you missed copying the address or need it again, you can click “Re-verify” or go through this receiving process again.
Step 4: Withdraw the asset from your exchange or crypto bank using the public key address you just obtained.
In this example, I selected the Withdraw option in Coinbase Pro, chose my example asset “ZEC”, and selected “Crypto Address” to get me to the proper window to enter the address to send to my Ledger.
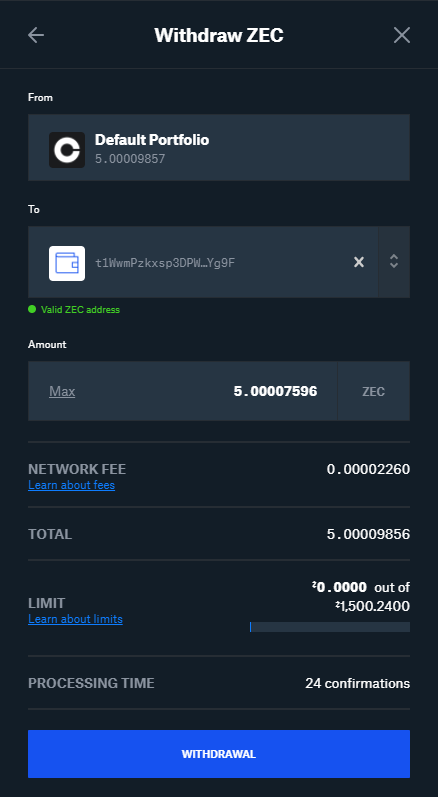
Enter your public key address and proceed to execute the transfer within your exchange’s interface. The address will have to be entered perfectly or your exchange may not see it as a valid destination. Copy/paste or scanning a QR code is much more reliable than entering the information manually.
There will be a network fee associated with the transfer, this is the charge to miners or validators for getting your transaction posted to the asset’s native blockchain.
Once the withdrawal request process has been completed, there will typically be a delay as the transaction is added and additional blocks are confirmed on top of it. This ensures that the record of your transaction is permanently recorded and is no longer modifiable.
💡 Note: It’s normal to feel some apprehension at this step if you have only held and traded crypto on exchanges and never transferred them before. There will often be some time period that the funds have left their original account and have not arrived yet in the new one. Trust that you’ve copied and pasted correctly; your coins will arrive as expected.
If you have any doubts about whether the transfer will work, you can always send a small test transaction to verify that the process will work before sending a larger sum.
After sufficient time has passed, you will see the transaction appear in your portfolio under the proper account.
Purchasing
Perhaps you don’t have crypto assets stored on an exchange or wish to leave them where they are, and would rather purchase directly in the Ledger Live app. For some jurisdictions, this is also an option to fund your hardware wallet!
Ledger offers a number of options to purchase crypto directly through Ledger Live, including Wyre, MoonPay, Coinify, and Banxa.
For this tutorial, we’ll use MoonPay.
Step 1: Set up your device and create a Ledger Live account
To use MoonPay to buy crypto, you need to first set up your Ledger hardware wallet and Ledger Live. We’ve covered these items in a previous post: How to set up your Ledger
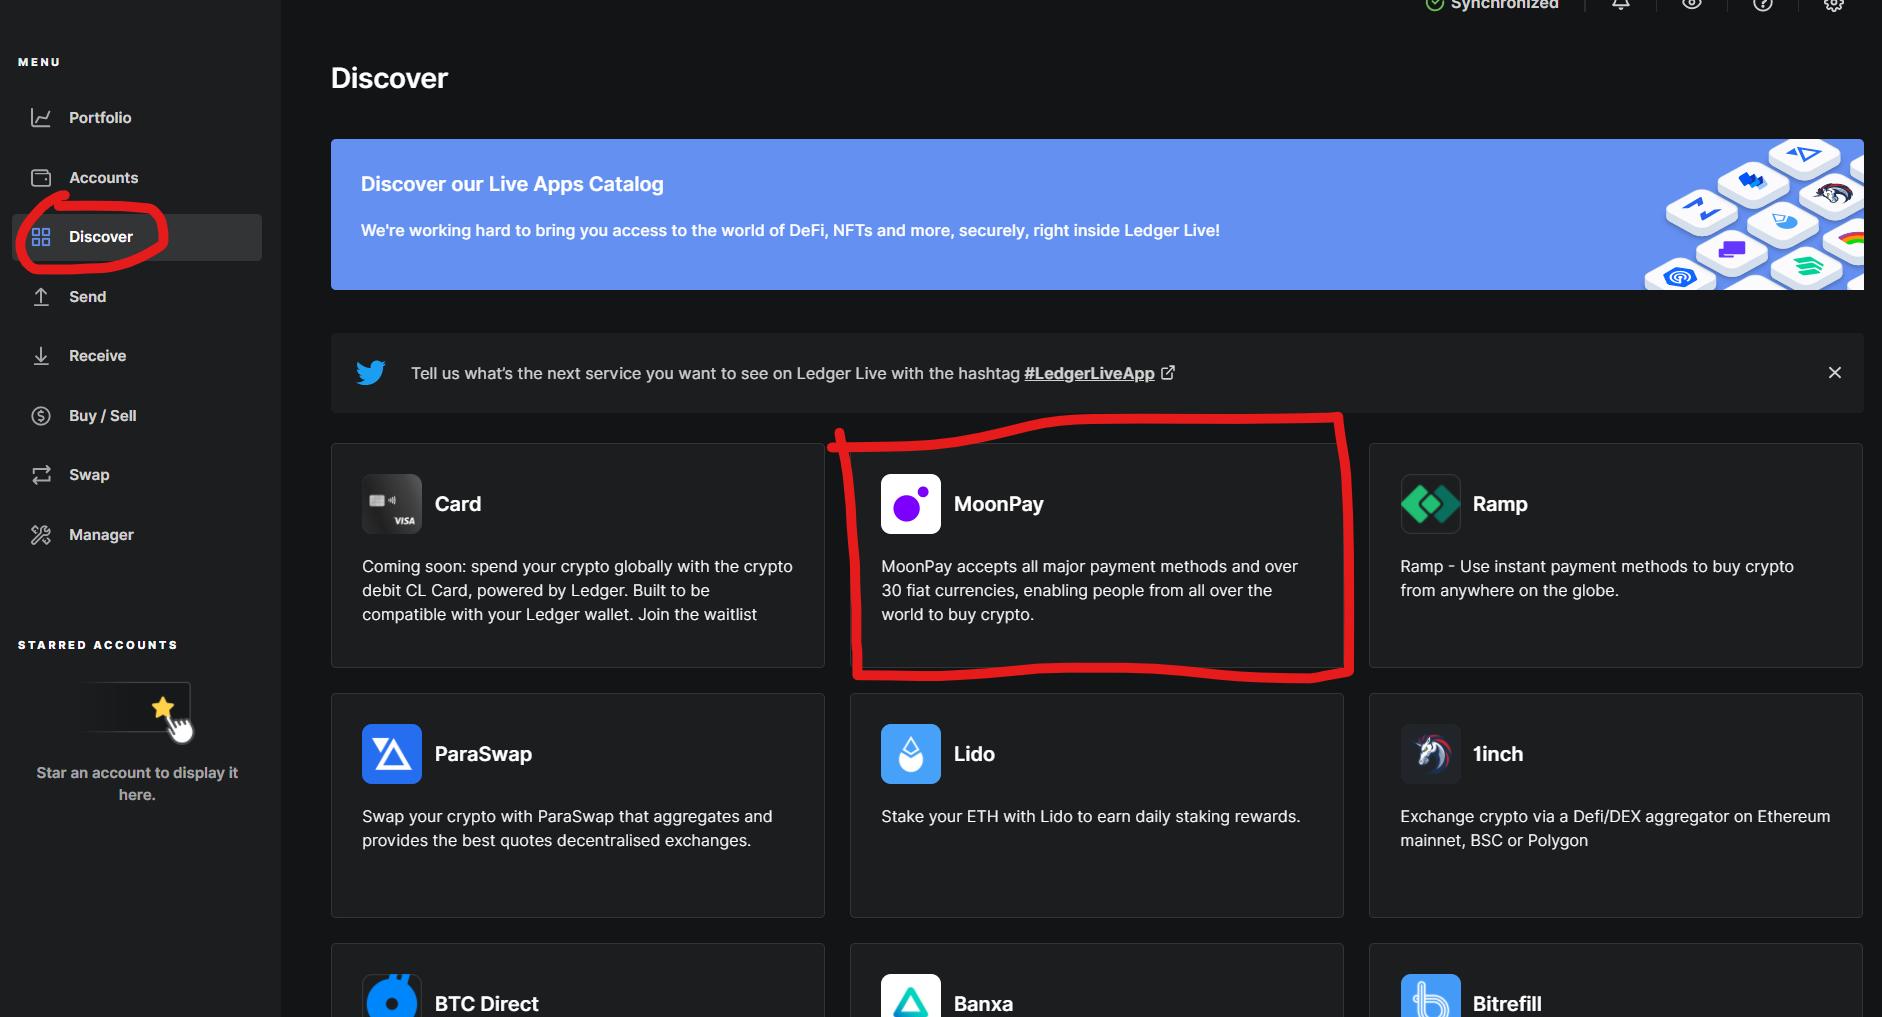
Step 2: Access MoonPay on Ledger Live
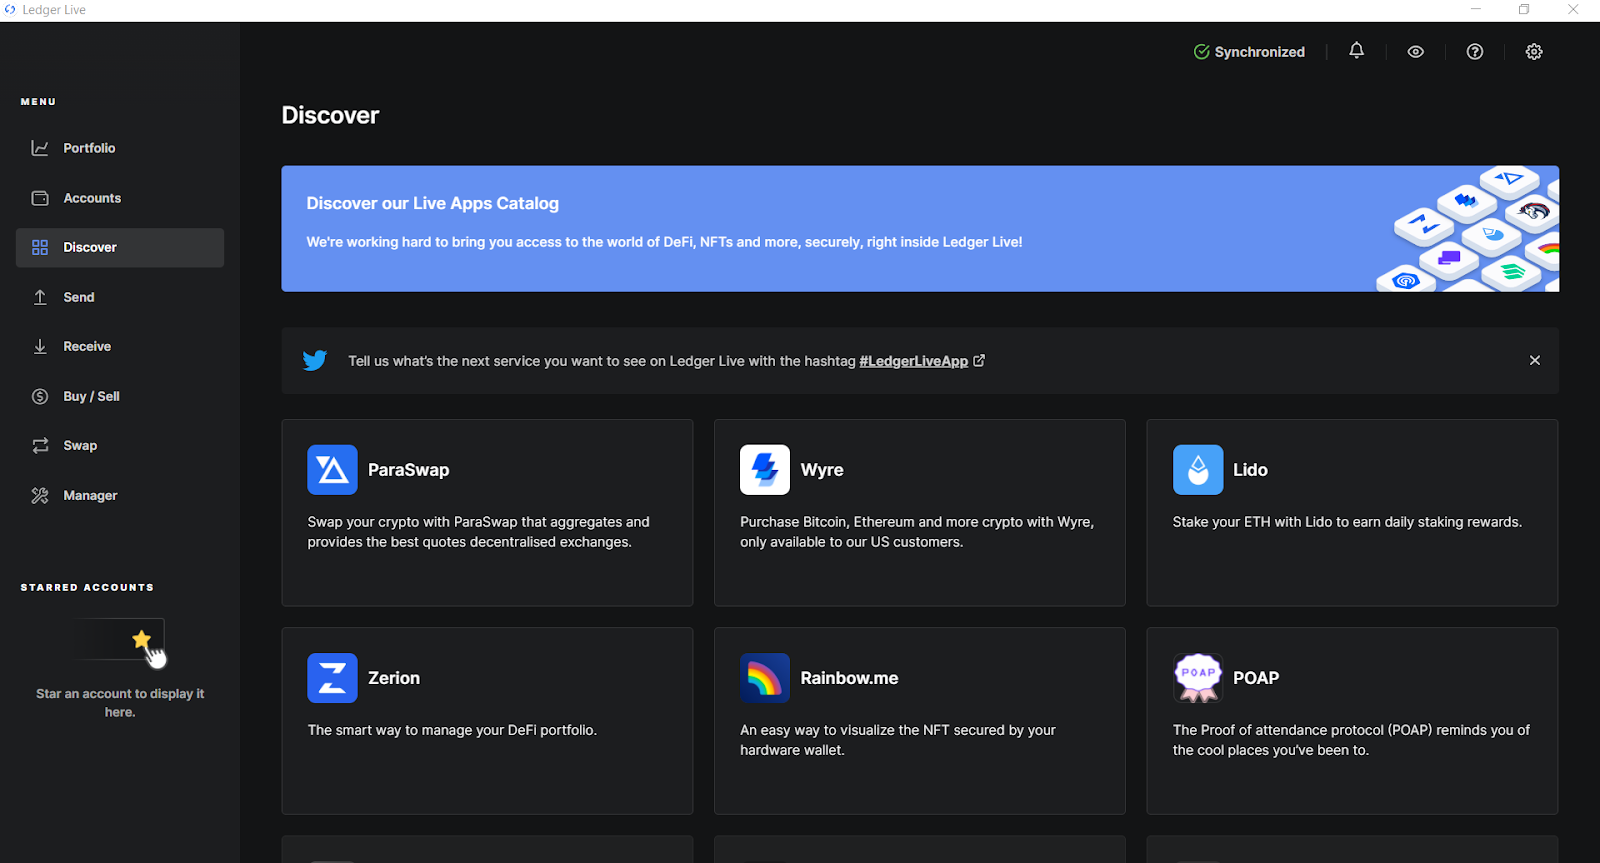
Head over to your Ledger Live app and click on the “Discover” tab under the menu on the left and select MoonPay. If this is your first time, you’ll be prompted to consent to operate an external application. Click “Continue.”
💡 Note: Different jurisdictions may have different requirements and Ledger has different partners for purchasing crypto directly in Ledger Live, depending on where in the world you live. Your experience with the app might be different than the screenshots provided.
Step 3: Purchase with MoonPay
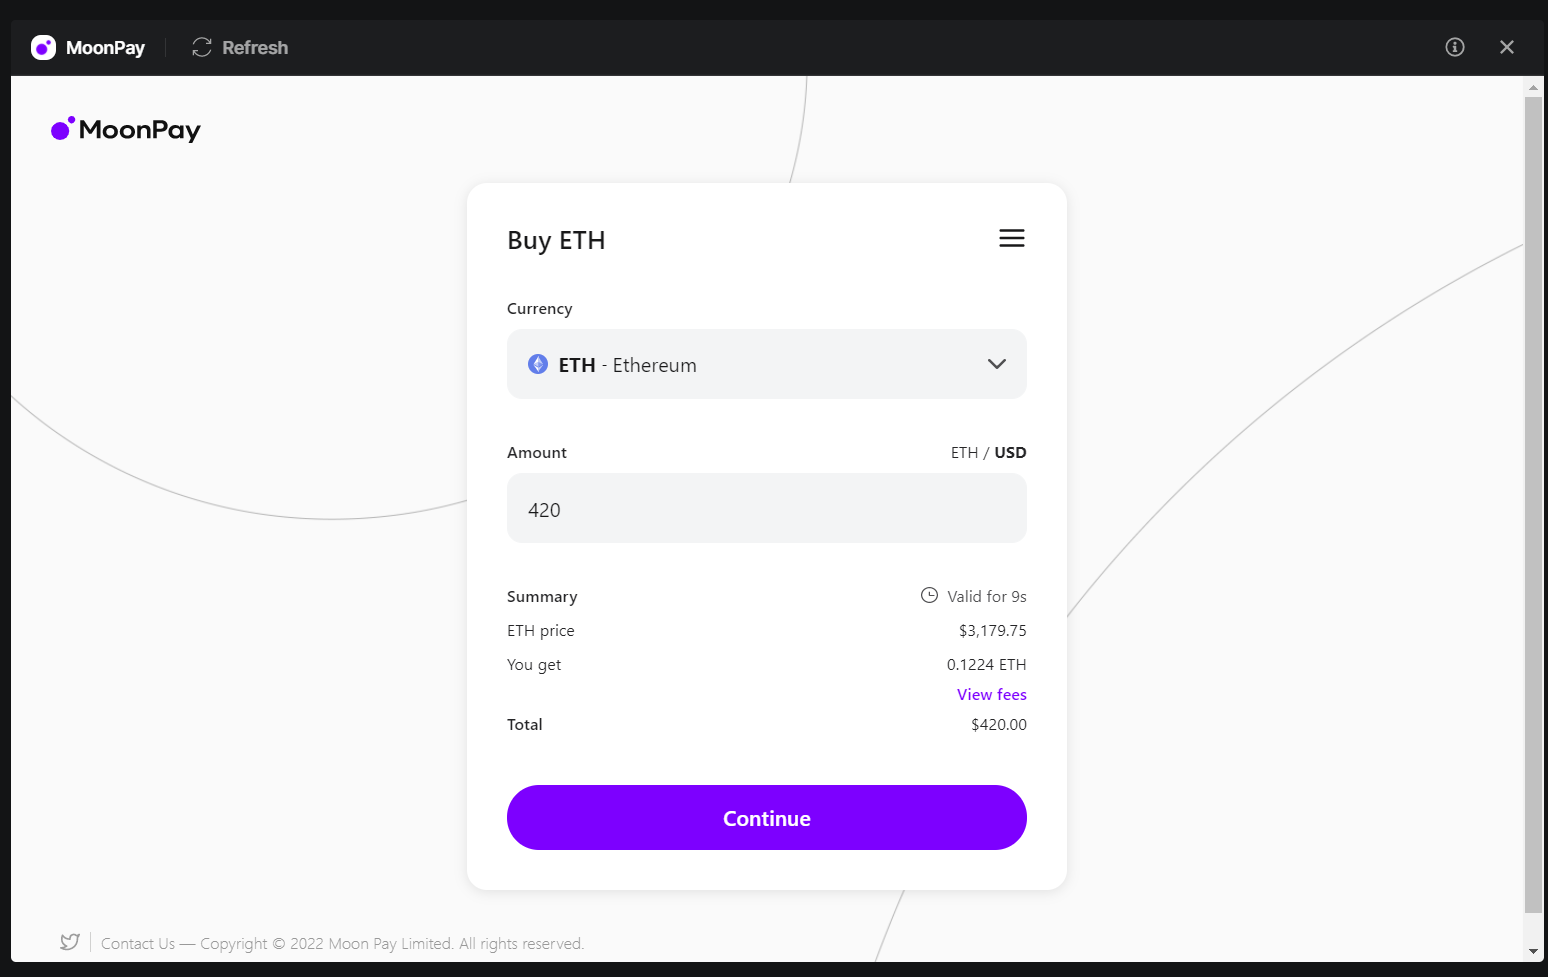
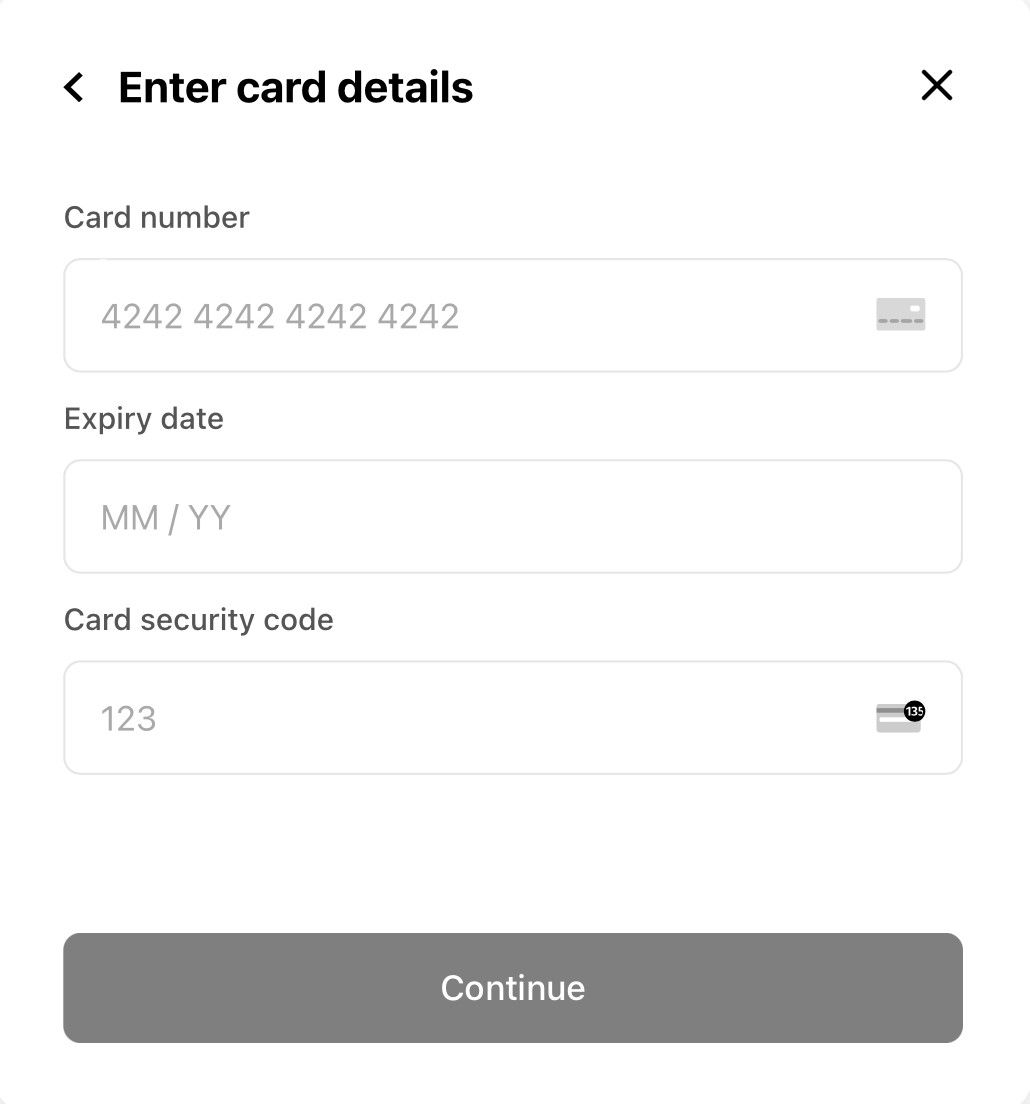
MoonPay allows you to purchase crypto using bank transfers or payment cards. Select the currency you wish to purchase and enter the amount you wish to purchase. and click continue.
The next page will ask you wish account you wish to fund with your purchase. (See the “Transferring assets into your Ledger” section on how to set up an account.)
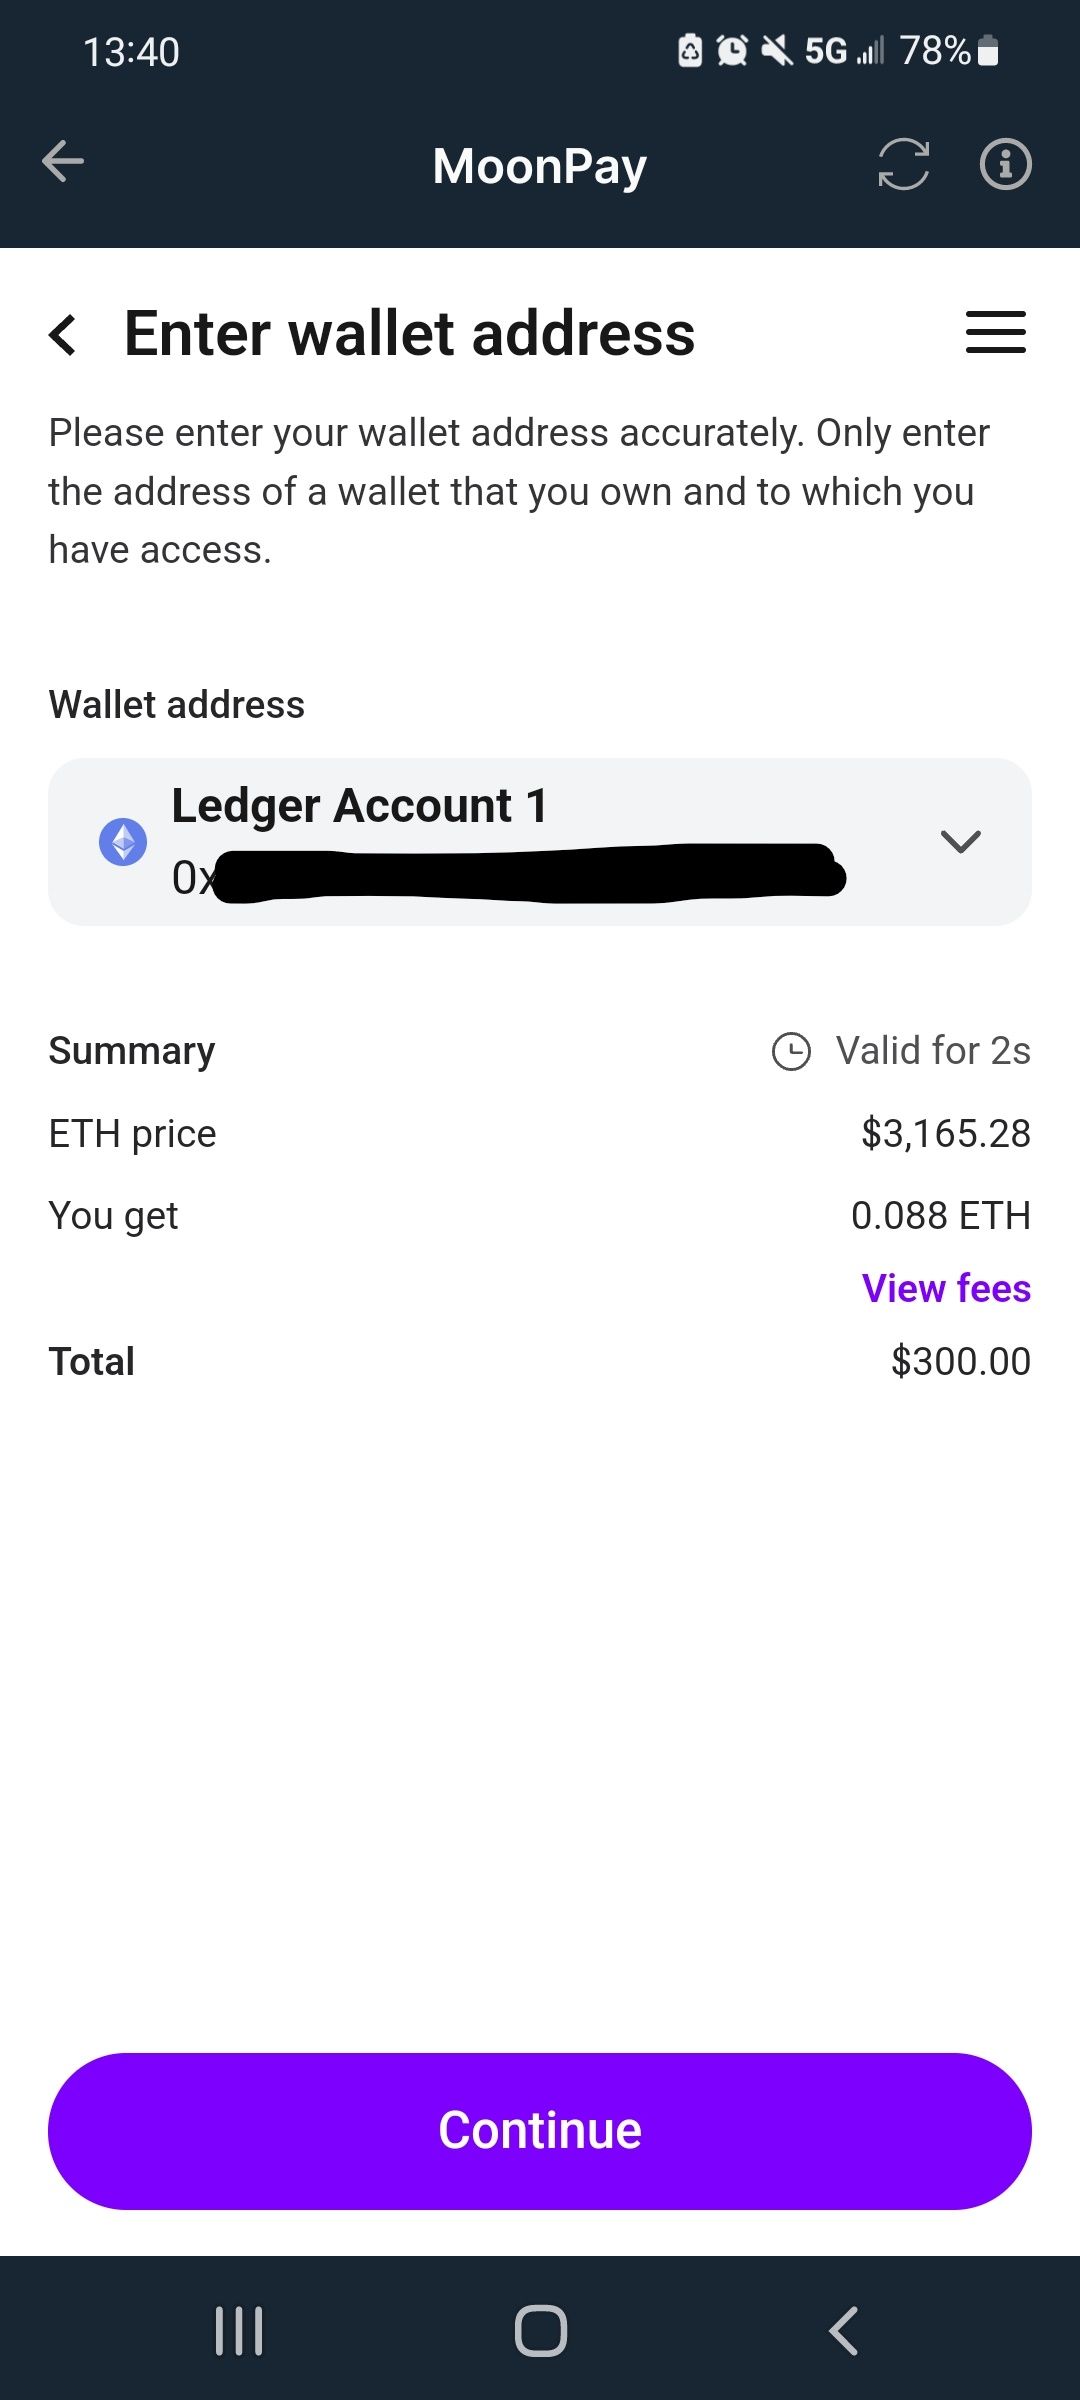
Make sure your hardware wallet is connected at this point. Ledger Live will ask you to verify the wallet address you are sending to with your hardware wallet.
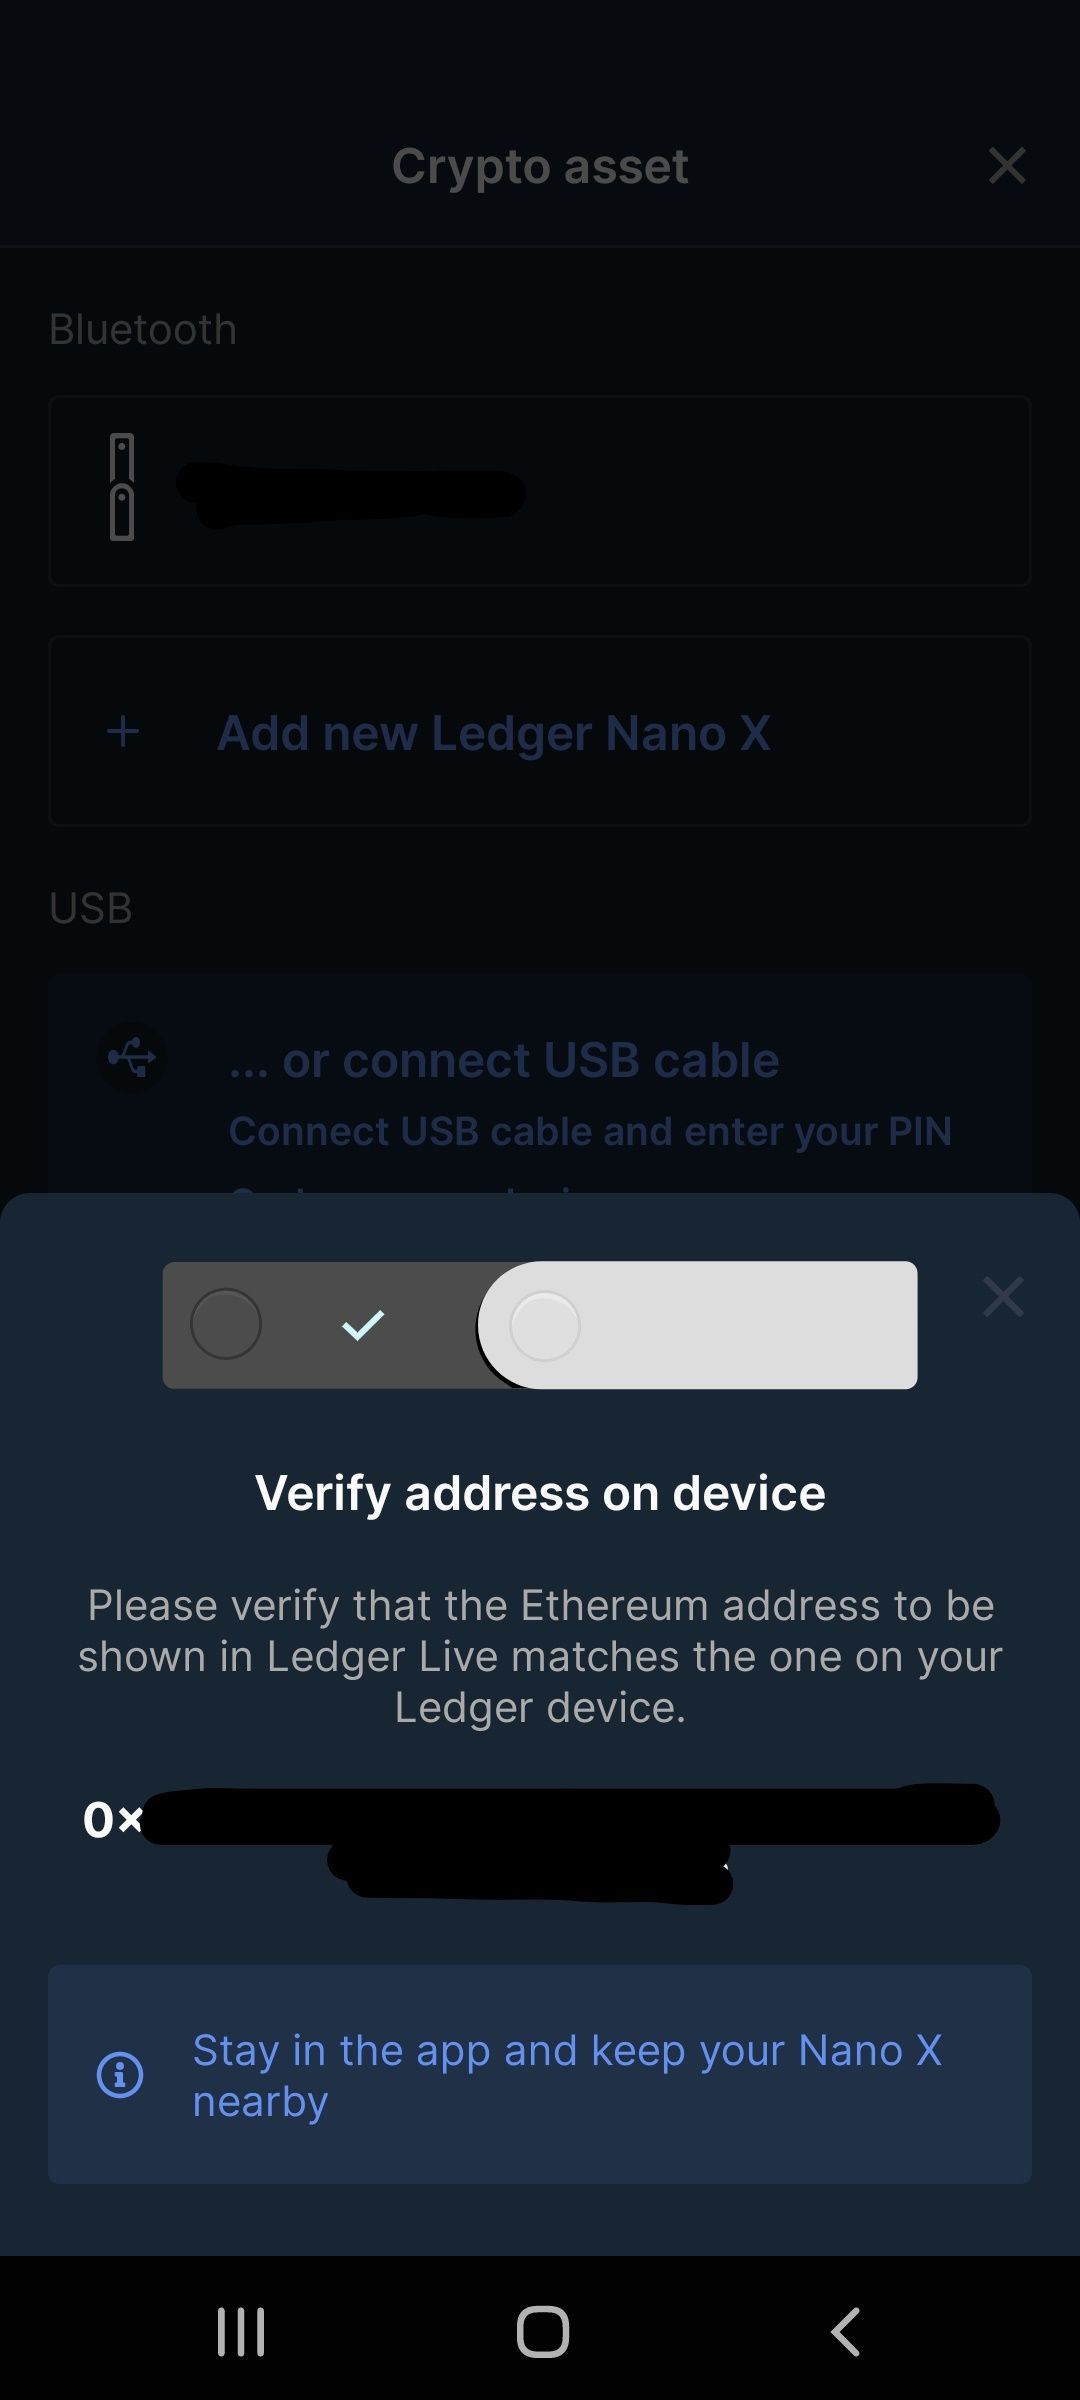
If the address shown on Ledger Live matches the address on your hardware wallet, press both circular buttons on your hardware wallet to Approve. Navigate back to your Ledger Live and your address will populate the Wallet Address section.
Step 4: Set up your MoonPay account
If this is your first time using MoonPay to purchase, you will need to set up an account. This process can be quite tedious, as you will have to follow your jurisdiction’s KYC and AML requirements.
If you’ve ever set up an account on a centralized exchange like Coinbase or Gemini, the process will be familiar.
Step 5: Make your purchase
After your account has been set up, you can select your payment method, be that a bank transfer or payment card.
Now that you have been through the process of loading funds onto your wallet, you should feel more confident knowing that any crypto you own on whatever platform can be moved to your own personal cold storage vault with these steps.
Repeat them often!
You alone hold your private keys to access that vault. No exchange shutdown or bank restriction can stop you from using these funds, they are free to be deployed anywhere on their native blockchains as long as you retain access to your Ledger hardware wallet.
This is monetary self-sovereignty, and with great power comes great responsibility.
Swapping
Buying and selling coins using fiat currency is one way to deposit into your Ledger wallet. Another is to directly exchange one cryptocurrency directly into another. This stands in contracts to selling one cryptocurrency coin for fiat, then using that fiat to buy another coin.
Ledger supports apps like Changelly, Paraswap, and 1inch directly within Ledger Live to make these swaps with just a few clicks.
Why swap crypto with your Ledger?
- Swapping is a way to quickly diversify your portfolio
- You can utilize stablecoins such as USDT to realize trading profits or protect against potential USD losses incurred by holding volatile assets in a bear market
- It’s simple and fast, and completely avoids the need to send the assets to exchanges
Swapping assets within Ledger Live using Changelly
Changelly Step 1: Update Ledger Live or download the latest version onto your PC or mobile device. If your Ledger hardware wallet is not running the latest firmware, update it to the latest version as well.
Changelly Step 2: Ensure the app for the asset you wish to swap for is downloaded onto your Ledger hardware wallet. Go back to the Transfer Step 1 section above and use the Ledger Live app manager to add any additional apps needed.
Changelly Step 3: Add an account for the crypto asset that you will add to your ledger, if you don’t already have one. See Transfer Step 2 for a refresher on creating accounts for your hardware wallet.
Changelly Step 4: Navigate to the Manager tab on the left side menu and install the Exchange app on your hardware wallet. This app allows your hardware wallet to communicate with the swap service Changelly, from within the Ledger Live app.
Changelly Step 5: Once the Exchange app is downloaded, you should be able to perform coin swaps within Ledger Live, if Changelly swaps are supported in your jurisdiction.
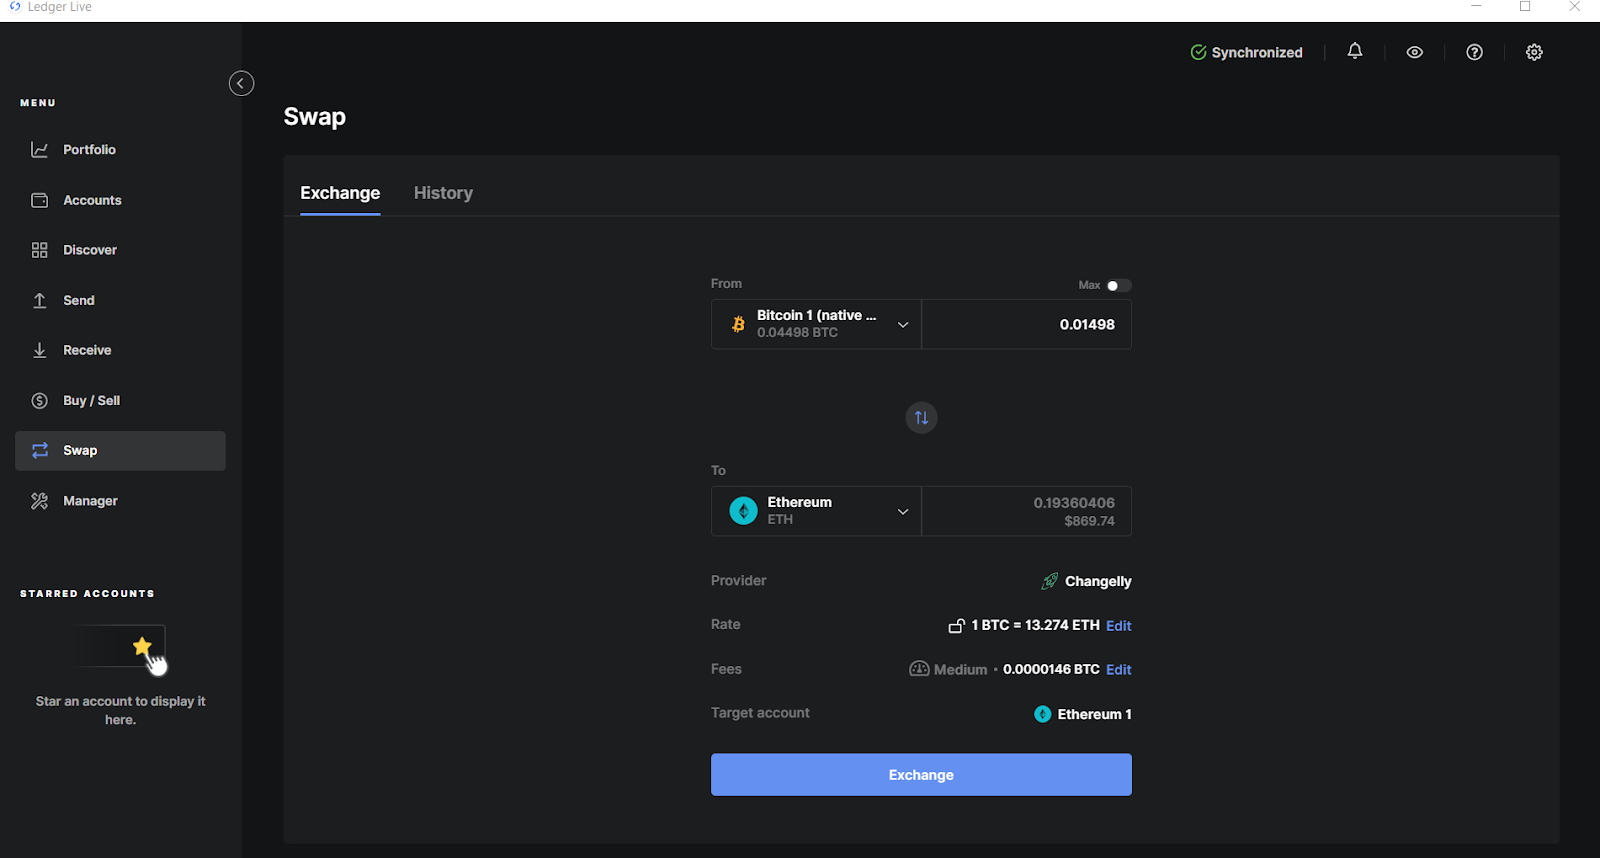
- Navigate to the Swap tab on the left hand side Menu.
- Enter the “From” and “To” Ledger Live accounts you wish to use for the swap, and the amount of the asset in the “From” account you would like to contribute to the swap.
- Review the quoted rate and network fees charged for the transaction. Ledger Live’s swap provider Changelly charges a spread on the exchange rate, so be advised that the network fee listed is not the only cost of executing this transaction. Make sure you are okay with the price before clicking “Exchange”.
- Depending on your jurisdiction (and any required compliance to anti-terror and anti-money-laundering regulations), you may be required to complete a Know-Your-Customer (KYC) identification process before making the exchange.
- Once you process the request to swap, you will be asked to sign the transaction in the usual way by pressing both buttons on your hardware wallet. Once your transaction is confirmed, it is sent to Changelly for processing. This part can take up to an hour, but Ledger Live will give you plenty of info to track your pending transaction.
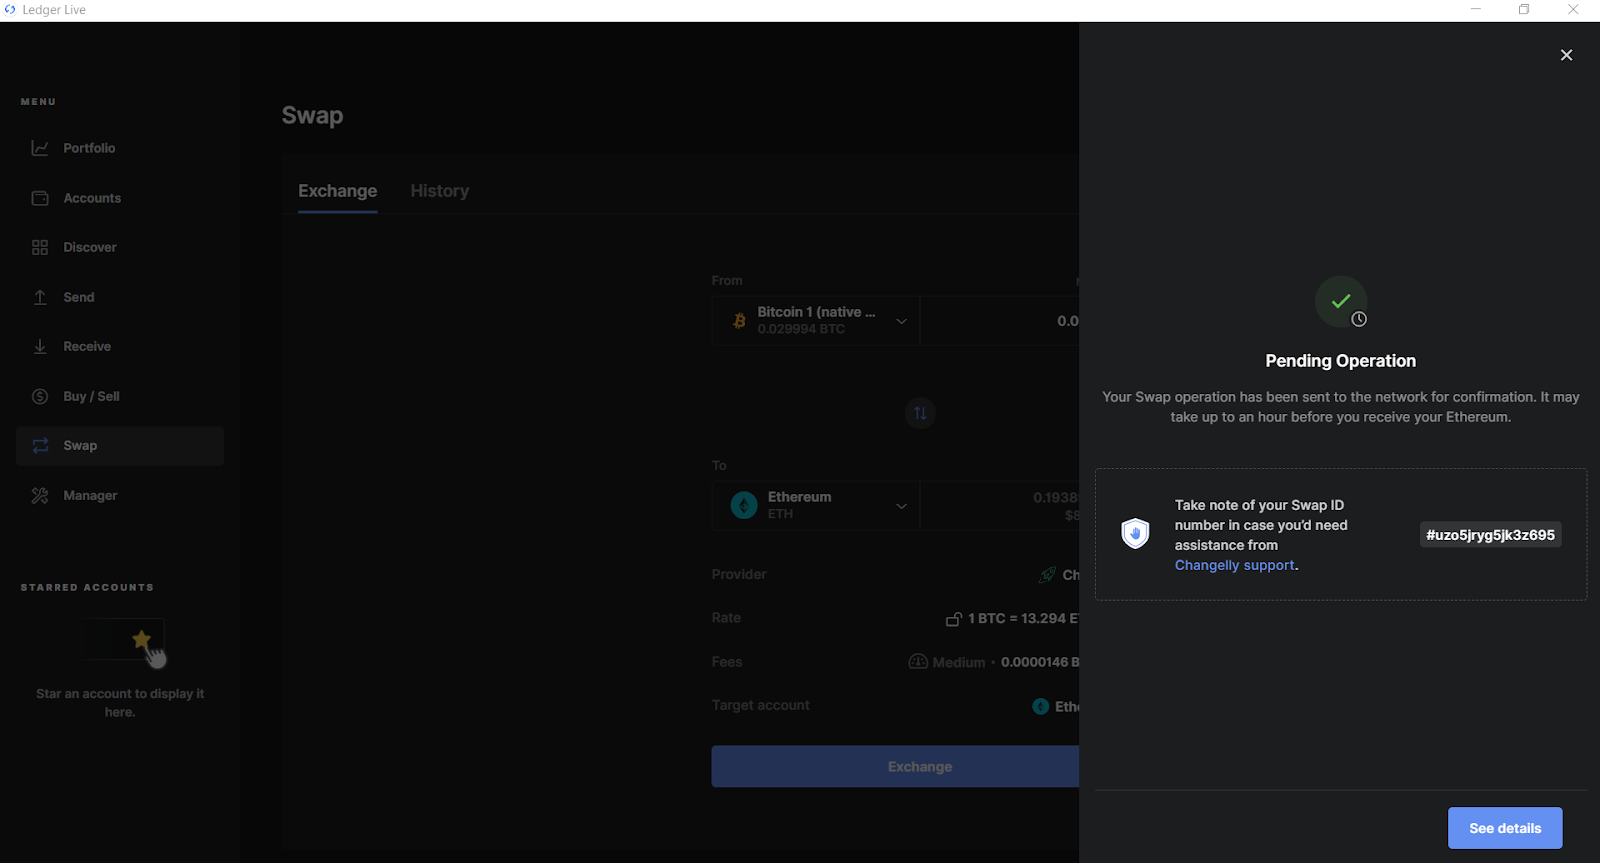
- The first screen will just show the Changelly Swap ID. Ledger Live stores this info so there is no need to immediately write it down. Click on the blue button below that says “See details”. The next screen displays the Swap ID again along with status, the addresses used, and a link to the blockchain explorer page for that transaction for on-chain verification. You can retrieve this information at any time by navigating to the History tab under Swap and clicking on the transaction for which you need the details.

💡 Note: Ledger Live uses different partners for swaps depending on where you are in the world. If Changelly is not offered in your jurisdiction, the Ledger Live app may look and behave differently from the screenshots shown. There is a helpful guide on the Ledger site if you need a primer on swapping assets with Wyre.
Swapping assets within Ledger Live using Paraswap
If you wish to exchange between ETH and/or any ERC-20 tokens on the Ethereum network, Paraswap provides a very nice user experience.
The Ledger support site describes Paraswap as “a decentralized application (dApp) that aggregates multiple decentralized exchanges (DEXes) in a comprehensive and convenient interface”. By checking the exchange rates from multiple DEXes, you can be assured that you are getting the best possible rate for your trade.
It should be noted that ParaSwap is a Layer 1 exchange aggregator, so you will need to pay the transaction fee (or “gas”) required to have your transaction confirmed on the Ethereum mainnet. This can be a significant cost, so be aware. At the time of writing, congestion on Ethereum is such that gas fees in excess of 100 gwei (corresponding to $90 or more for a typical swap transaction) are common. As such it may not make much sense to trade amounts under $1000, as your transaction fee will eat up a significant portion of your asset’s value.
Paraswap Step 1: Update Ledger Live or download the latest version onto your PC or mobile device. If your Ledger hardware wallet is not running the latest firmware, update it to the latest version as well.
Paraswap Step 2: Download the Paraswap app onto your hardware wallet.
- Open Ledger Live and connect your Ledger hardware wallet to your device running Ledger Live. Unlock the wallet with your PIN, and press both buttons to allow Ledger Live to access the wallet. Go to the Manager tab to view the apps that are downloaded onto your device.
- In the search bar, type “Paraswap” and the app should appear below.
- Download the Paraswap app as per the usual method.
Paraswap Step 3: Ensure the Ethereum app is downloaded onto your Ledger hardware wallet, and add an Ethereum account if you don’t already have one. Ensure the app for the asset you wish to obtain is downloaded onto your Ledger hardware wallet (if an app is available). Go back to the Transfer Steps 1 and 2 sections above for a refresher on how to do this.
Paraswap Step 4: Access the application through the Discover tab in the left hand side Menu.
- Click on ParaSwap to open the interface. A disclaimer will pop up to remind you that ParaSwap is an external service provider. Click the Continue button to enter the ParaSwap user interface. The default screen is shown below.
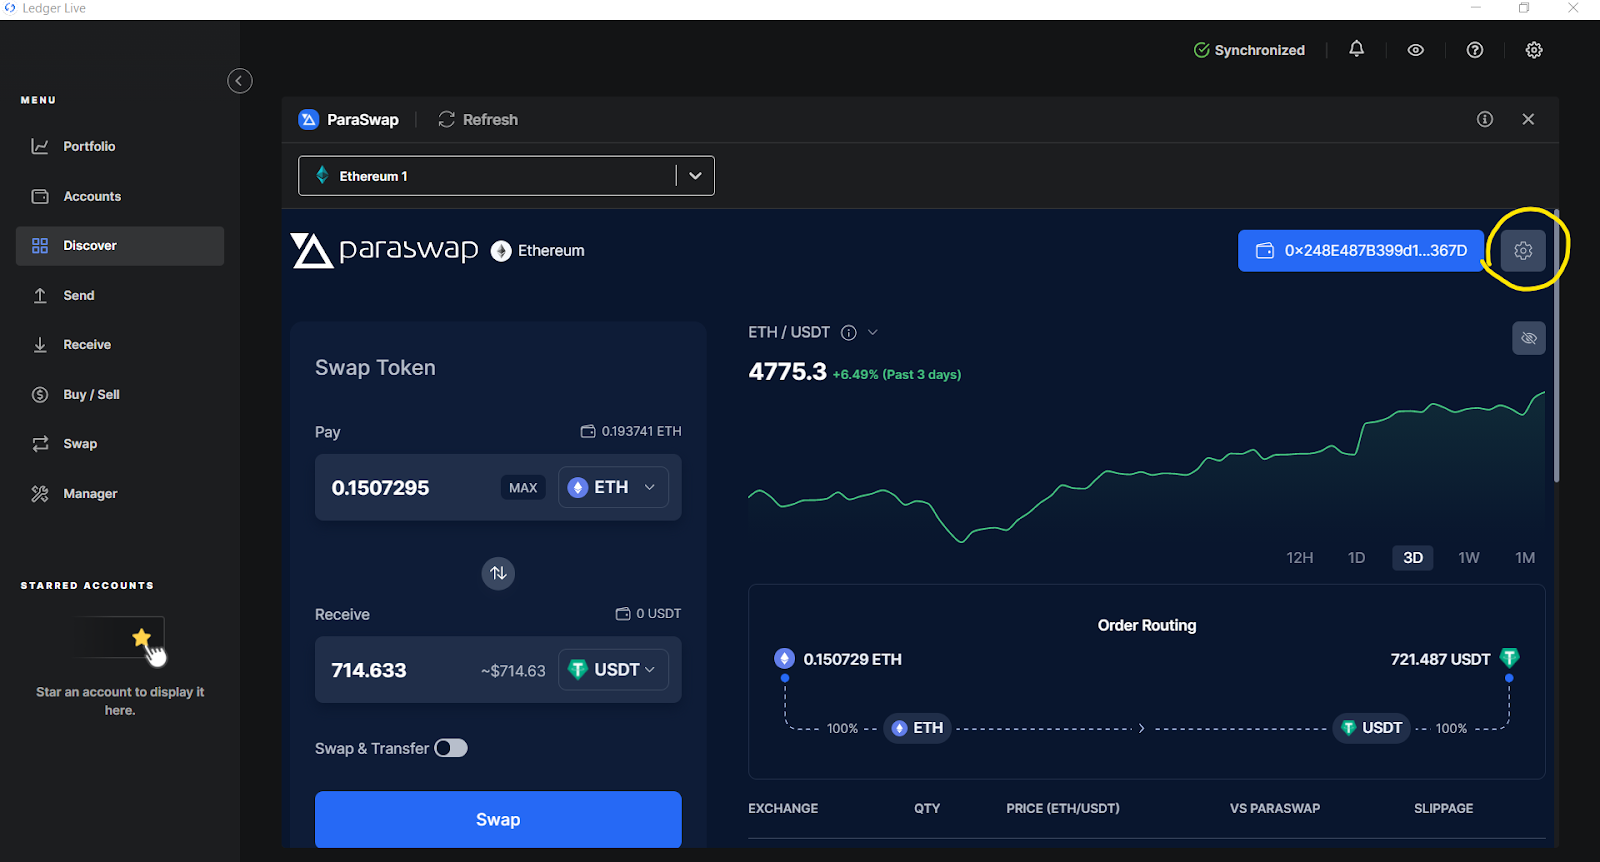
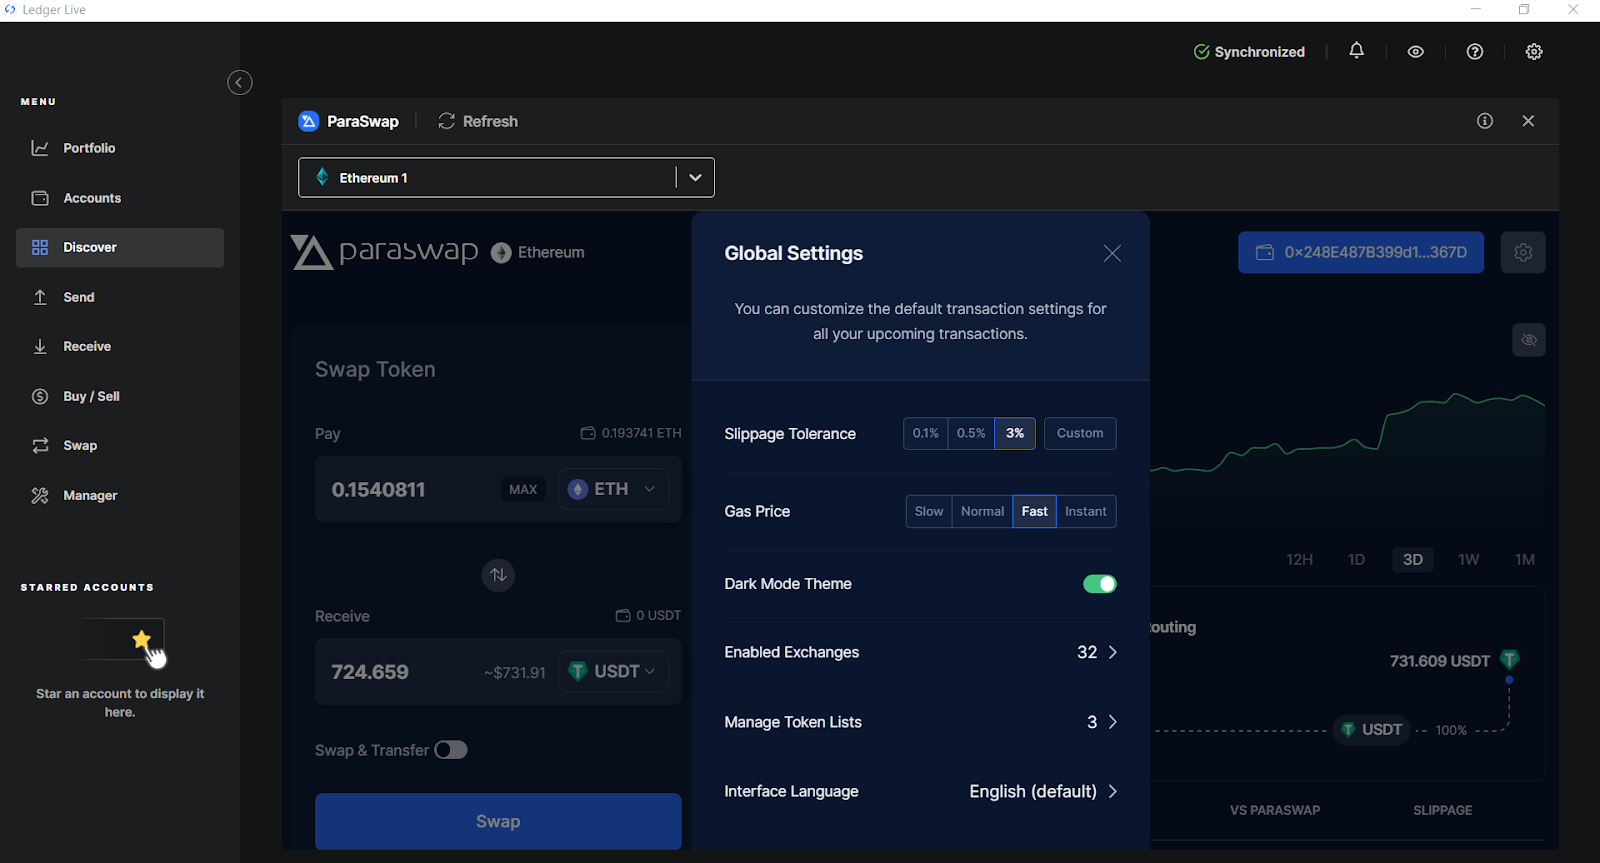
Click the Settings icon circled in yellow in the above screenshot to view options for your ParaSwap trades. You can set your slippage limit on trades and gas price to suit your transaction’s target timeframe for finalization.
You can toggle Dark Mode on and off. You can specify which exchanges ParaSwap uses for determining your order routing. You can manage which token lists are viewable in the drop down menu on the swap page. And finally, you can set the language displayed within the ParaSwap interface.
- After specifying your preferred Global Settings, you are ready to set up a trade. Select the assets you wish to trade in the drop-down lists under Swap Token.
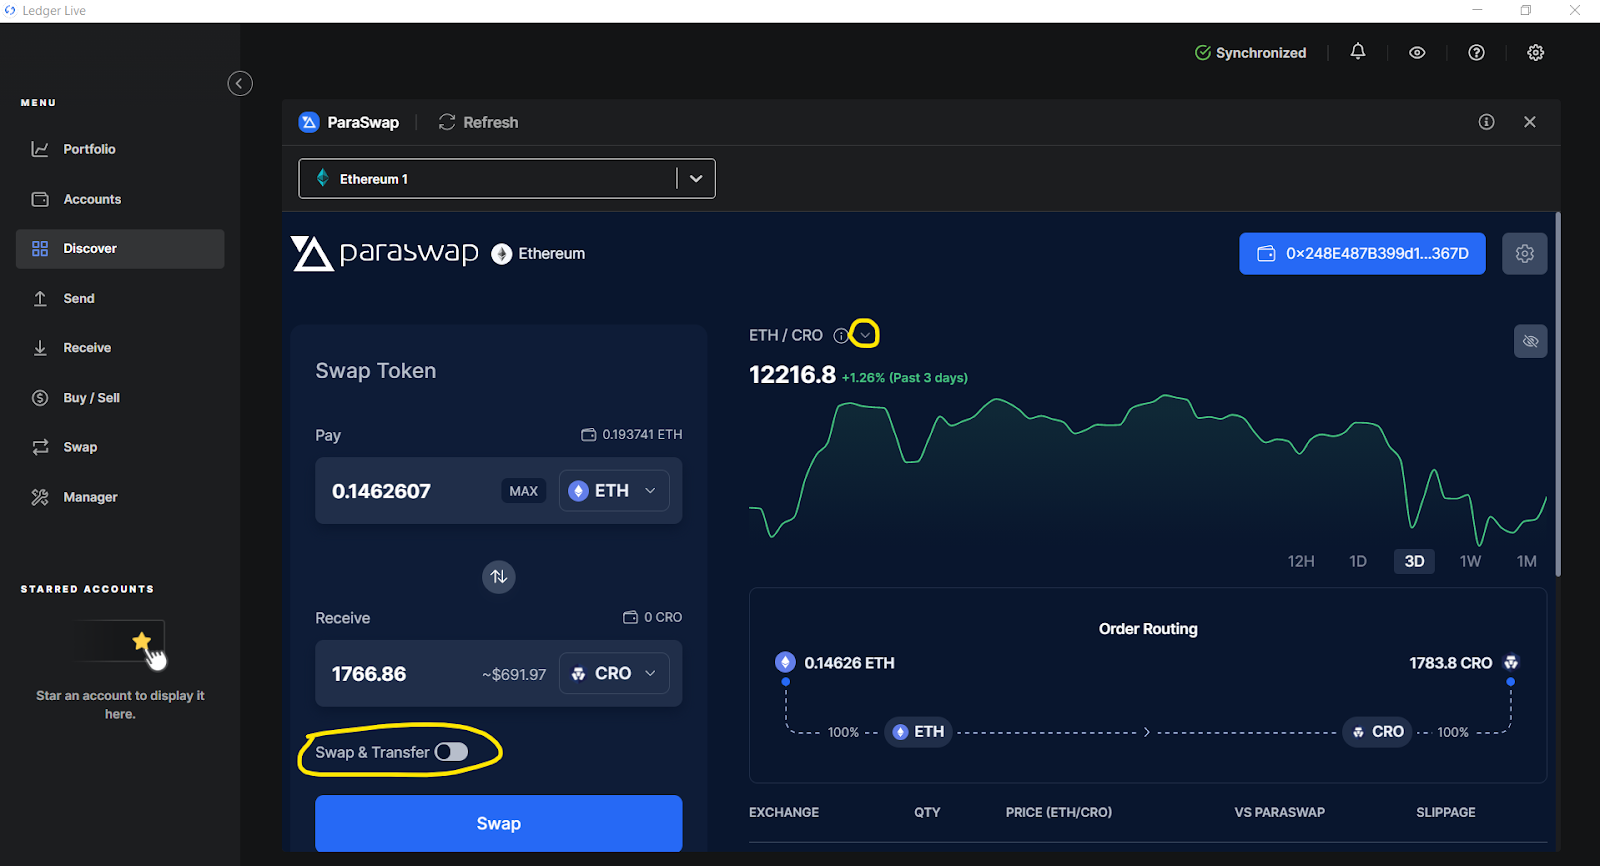
- You can change how the price chart is displayed by clicking the small down arrow next to the pair name above the chart. Typically other charting apps will show prices with ETH in the denominator. If you are selling ETH for an ERC-20 token, ParaSwap defaults to the inverse of this, with ETH in the numerator (to show how many of the token you can receive by selling 1 ETH). You can adjust this as desired or choose to view the assets you are trading in USD terms via this dropdown menu.
- Another great feature of the ParaSwap interface is the Swap and Transfer function. Toggle this on, and ParaSwap gives you the option to send the asset you are receiving to a different wallet address than your Ledger’s. If you plan to send the asset for which you are trading to a hot wallet for example, go ahead and do this as part of the exchange and save yourself the gas fees of that secondary transfer. In the age of super-congested Ethereum blockspace, this feature is a huge value-add!
- When you have selected the assets you wish to exchange, the ParaSwap app will show you estimated transaction fees (Estimated Cost) and slippage (Price Impact) and the minimum amount of the asset you’ll receive (this can vary since DEX pricing and transaction fees will often fluctuate from the time of the quote until the time that the actual transaction is processed). At the bottom right of the interface you can see the proposed order routing.
- The Ledger site has a great overview on managing your Ethereum ERC-20 tokens here.
Conclusion
Adding assets and swapping within Ledger Live should now feel achievable. Go ahead and load up your wallet and swap as necessary.
Hopefully, you can now have peace of mind that you can make these maneuvers from a secure cold storage wallet such as Ledger. Perhaps, you’re interested in earning a little ‘something-something’ on your assets while you sleep? If that’s the case, let’s take a look at the subsequent article in this series, “How to Stake with Your Ledger.”