How to tokenize yourself
It only takes 1 DAI to give a Bankless scholarship. Help improve the program & reach more ppl
Dear Crypto Natives,
Who says Spencer Dinwiddie is the only one who gets to have all the fun?
You can tokenize yourself on Ethereum too! You may not have an NBA contract but you have hours in your work week you can tokenize and sell. Aren’t you curious what people will pay for them?
Maybe an hour of your time starts low, but as demand increases each hour becomes more valuable? I bought an hour of Joe’s time for .19 ETH but now it costs .32 ETH!
This tactic gives you the tools to mint you own token. It’s doable in an hour or so.
Yes, the tools are a bit rough, but be persistent. You think the internet was easy to use in 1994? The people who spent time leveling up then became the titans of tomorrow.
You have to use this stuff to see its potential.
So let’s create a personal token & level up!
- RSA
TACTICS TUESDAY:
Tactic #19: How to tokenize yourself
Create a personal token, a way for users to redeem it, and a liquidity pool so they can buy it. Deploy on Ethereum using Openlaw, Uniswap, and Etherscan. All you need is MetaMask, some ETH to seed the liquidity, and some time to sell.
- Goal: Create a liquid personal token for yourself including redemption & liquidity
- Skill: Advanced
- Effort: 1-2 hours
- ROI: How much token demand can you drive—that’s your ROI
Learn to mint, distribute, and burn personal tokens
Post by: Above Average Joe, Bankless community member
By the end of this tactic, you’ll have the knowledge to digitally represent your time on the Ethereum network and put it on an exchange for anyone to purchase and redeem.
This tutorial has 4 steps:
- Create the token
- Create the redeem contract
- Put your token on Uniswap
- Redeem & burn the token
The token is ERC20 standard and compatible with web3 wallets. Today we’ll focus on the process itself and leave out detail on all the individual variables. The usual risks of contract hack and identity compromise are present, so make sure to never risk more than you are willing to lose.
Step 1: Create your token
This tactic is about creating a personal token you can use to represent your time, but your imagination is the only limitation on what a token like this could represent. Maybe your small business has several services it offers for instance—you could have a different token for each service you offer.
Things to consider:
- Each time you need to create more tokens you’ll need to create a new redeem contract with the new token contract address, so make sure you mint a large enough supply the first time
- Don’t be tempted to enter a burner email for the contract as you need to use that email to sign the contract to burn tokens
- Consider good wallet hygiene when choosing a wallet to mint your tokens into
- The Ethereum address you enter is where the newly created tokens will go
- Decimals of precision default is 18 (for adding custom tokens to a wallet)
- Local laws may consider a personal token without a burn contract as an unlicensed security, or may have restrictions on the methodologies used. Be aware of what your unique situation requires.
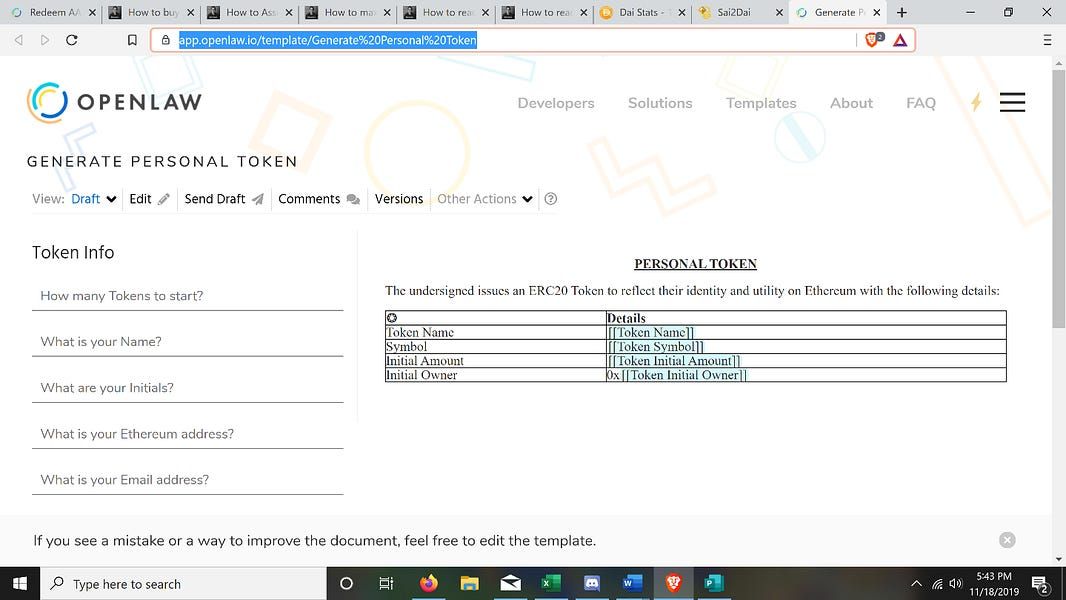
Begin by going to the Personal Token Generator on OpenLaw (create an account if you don’t have one) and fill out the token info fields on the left side of the page. (You can also Search “Generate Personal Token” here to access this page)

Once you’ve filled out the appropriate fields, click “send contract” on the upper left. (before filling out all fields, this button will display as “send draft”)
The next page should look like the below. Sign the agreement and the Rinkeby test network will record the signature. (Switch MetaMask to Rinkeby if needed—the signature is recorded on Rinkeby but you’ll switch back to deploy the token to the Ethereum Mainnet in the next step)

After signing the contract, You will see a bar pop up on the bottom of your screen that looks like this:

Once the network has recorded the transaction, the “Execute” button should become clickable. Clicking Execute will prompt a wallet transaction for approval. (Switch MetaMask back to Ethereum Main as needed)
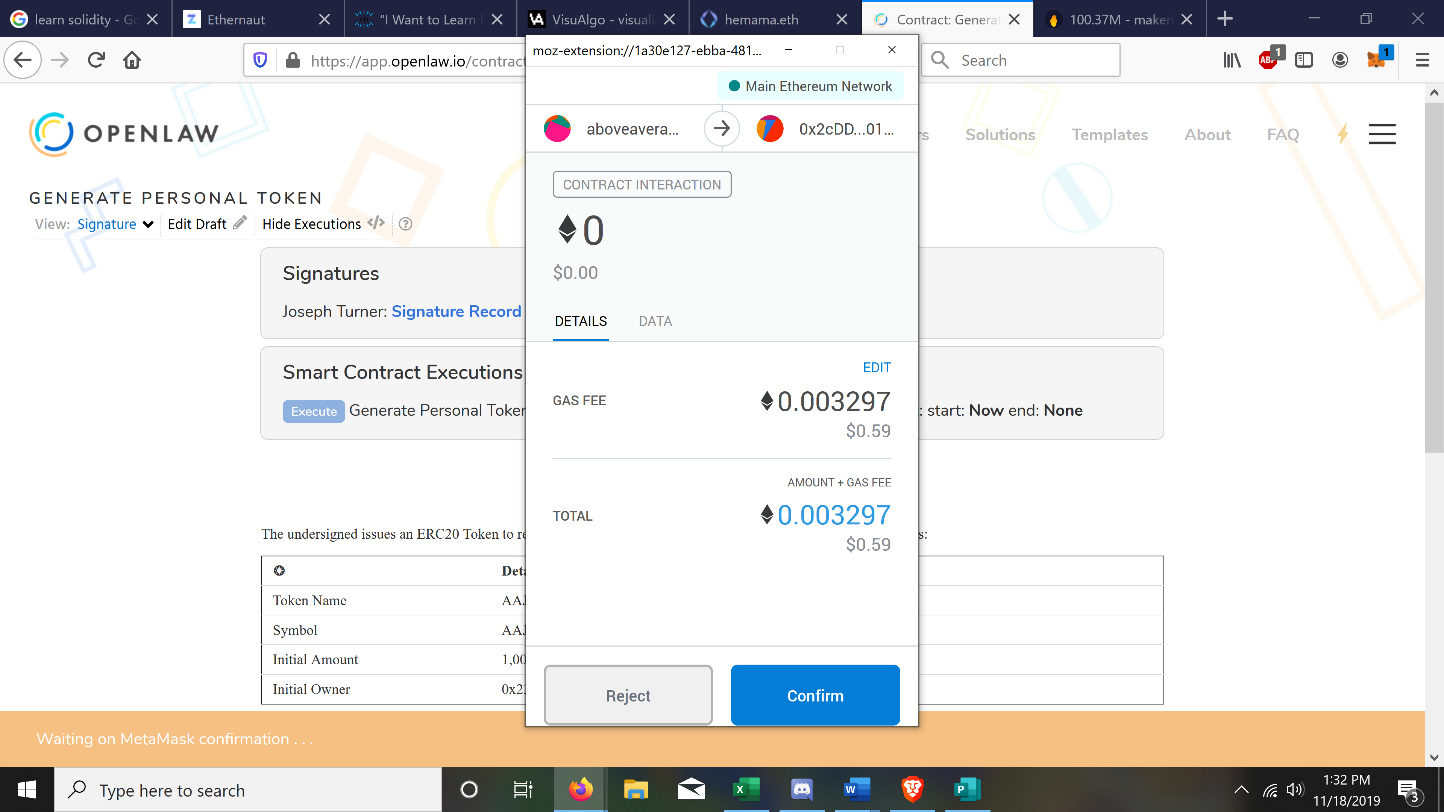
Once You confirm the wallet transaction your screen should look like this:
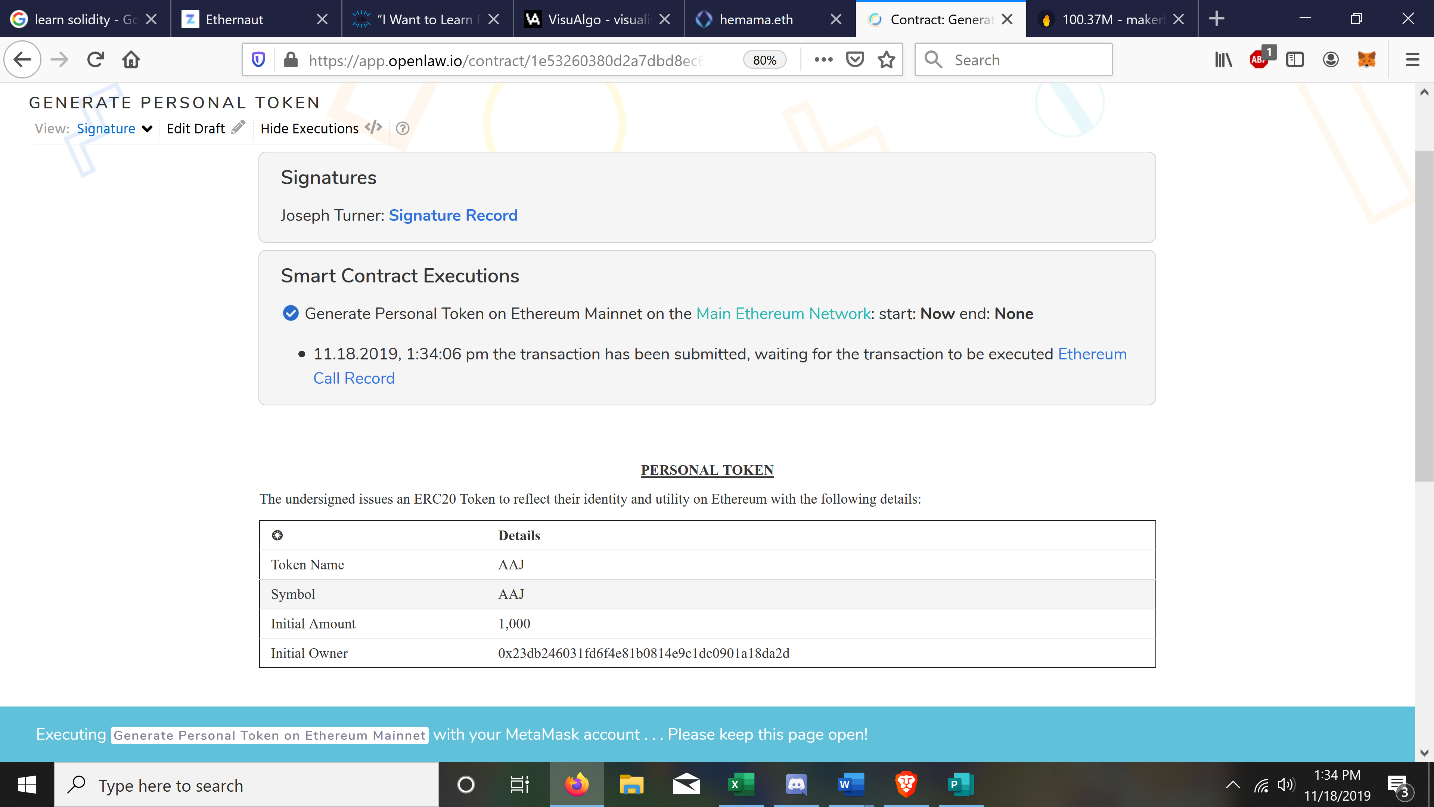
At this point just wait for the transaction to be recorded on the network. If the network is congested you may need to raise the gas price to push the transaction through. (At the time of writing 2.1 Gwei seems to get results in a few seconds)
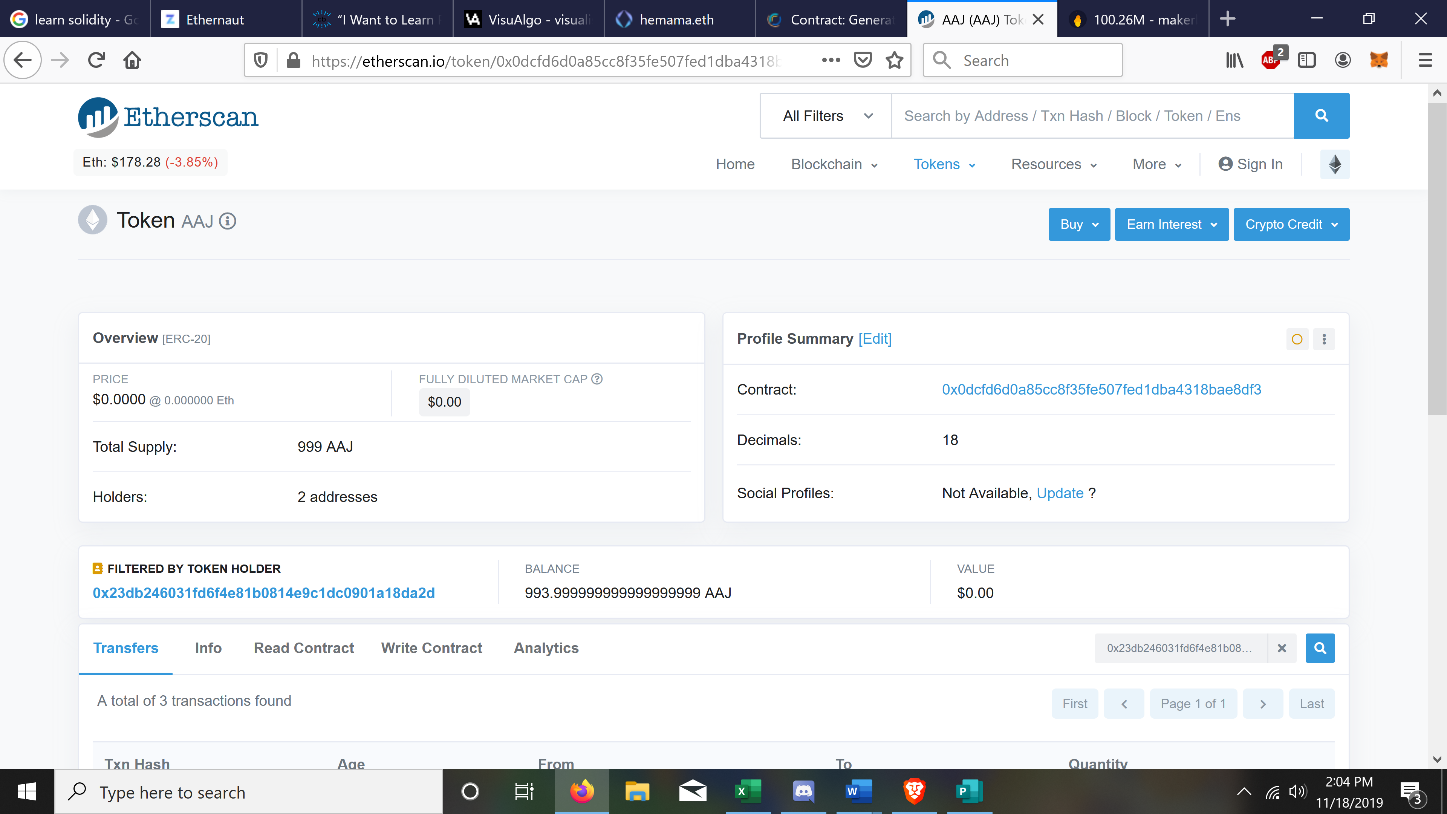
Once the transaction is confirmed, search for the wallet you minted your tokens to on Etherscan. One way to do this is to click the “Ethereum call record” and then click on the address in the “From” field. When the address comes up on Etherscan, In the box labeled “Overview” Click the dropdown list for “Token” and you should see your newly minted personal token there. Click on it.
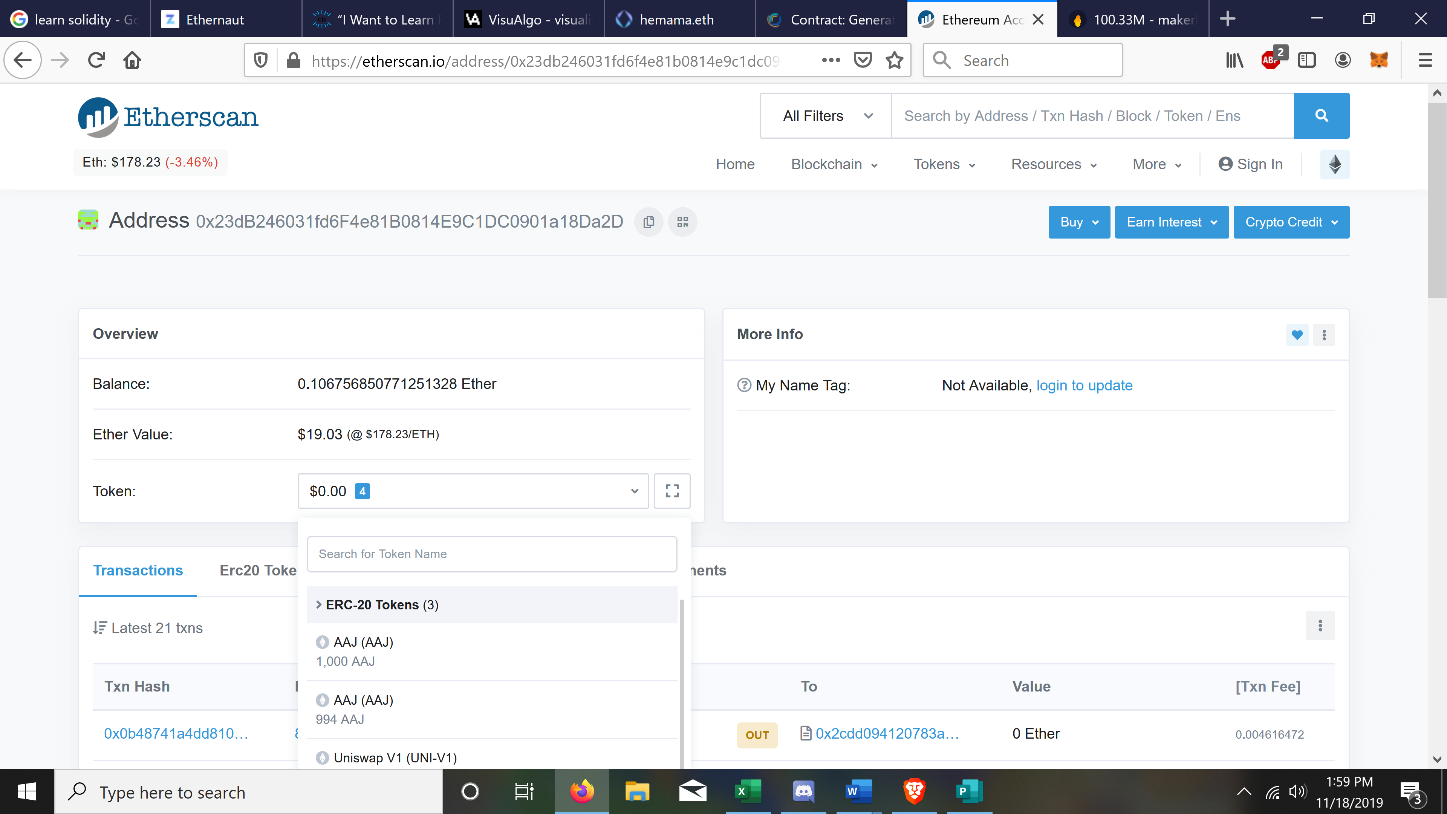
Clicking on the token will take you to the token contract information page, and under “Profile summary” you will find the contract address specific to your token. Save this address, you will need it to put liquidity into Uniswap and to tell people where to get your token! (not to mention make it visible in your wallet)
The next step is to add your custom token in your wallet, so you can track your balances and send them easily.
Each wallet should have a place to add custom tokens, in Metamask you can find it at the bottom of your wallet token list as shown:

Once you click “Add token”, go to the custom token tab, and enter the contract address you saved a few moments ago. The other fields below should autofill, but if not, enter your token initials and “Decimals of precision”.
Click “Next”, and a preview of the token should show up with your balance of tokens on the right.
Click “Add token” if everything looks correct, and your new personal token should show up in your Metamask wallet balances.
Congratulations, your personal token creation is now complete! If you stop here, you can still add liquidity, trade them away, give them as gifts, treat them as meaningless collectibles, swap tokens with other people who created their own tokens, anything you can conceive of. If you want them to burn your tokens though, you’ll still need to deploy another contract to Ethereum.
Part 2: Create redeem contract
This contract allows holders of your personal token to redeem their holdings at a ratio of 1 token = 1 hour. Without this contract, your tokens will act as a static supply, and have no redemption value. If you so choose, however, you can modify the redemption value to whatever you wish: a day, a particular service you offer, access to the secret family butterscotch pie recipe. The sky’s the limit.
To start go to OpenLaw and Start a New Template (go here and click “Get Started”) and give your redemption contract a name. (People who burn your token will search for this name on Openlaw—so something like “XYZ Reedem” can work.)
Copy and paste the following 43 lines of code into the new template, and replace each *Token* *Your Email Address* *Your token Contract* with the appropriate information. Don’t forget to delete the * symbols! There is a total of 16 changes in this template that need to be personalized.
When finished, your template should look something like this.
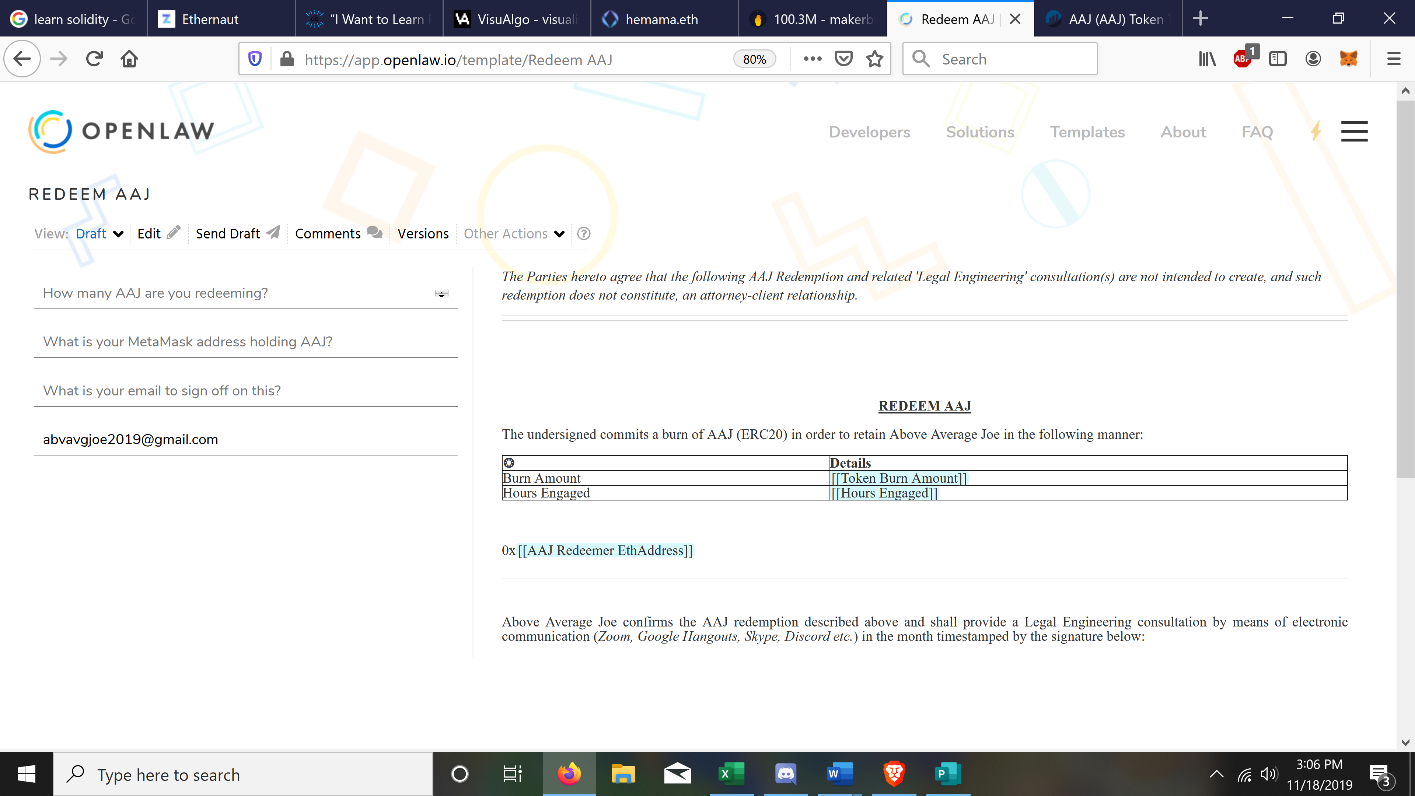
Once you have updated the fields, save the draft (Any improper changes or additions during copy and paste can cause an error that will not allow it to save. If this happens, compare it to the above code to find any difference) and click the back button to see your new redeem template. Save the URL on that page, and distribute it to token holders for your tokens to be burned! When complete, your draft should look like this:
Part 3: Putting your token on Uniswap
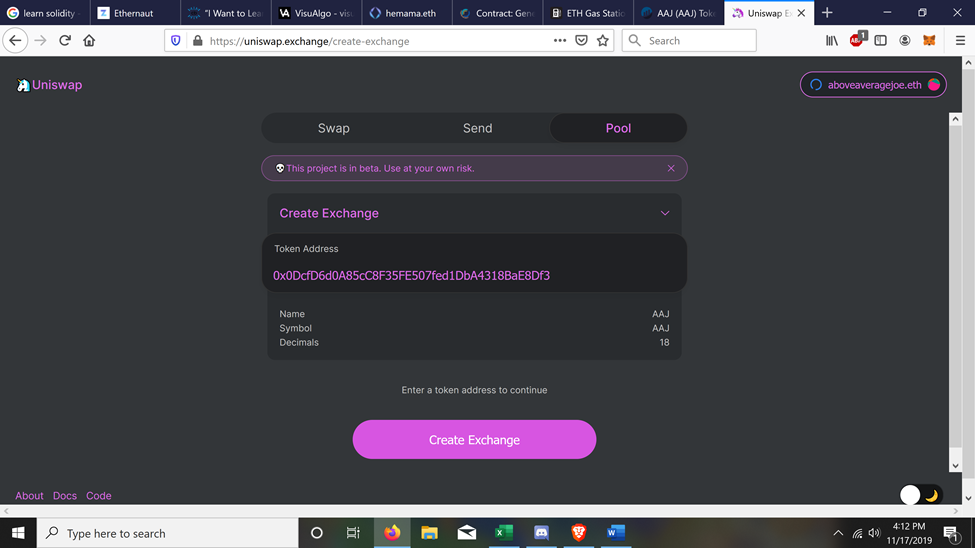
Uniswap is a permissionless exchange that works for all ERC20 standard tokens, and is a great way to distribute tokens to anyone that wants to purchase your time, or whatever your token represents. Go to Uniswap Create Exchange and connect with MetaMask.
Enter the token contract address you saved from Etherscan earlier, then click “Create exchange”. This will prompt a wallet transaction. Approve the transaction and when it posts to the network, your exchange will be created.
Your exchange has been created, but there’s no liquidity inside. Click the dropdown to the right of “Create exchange” and select “Add liquidity”
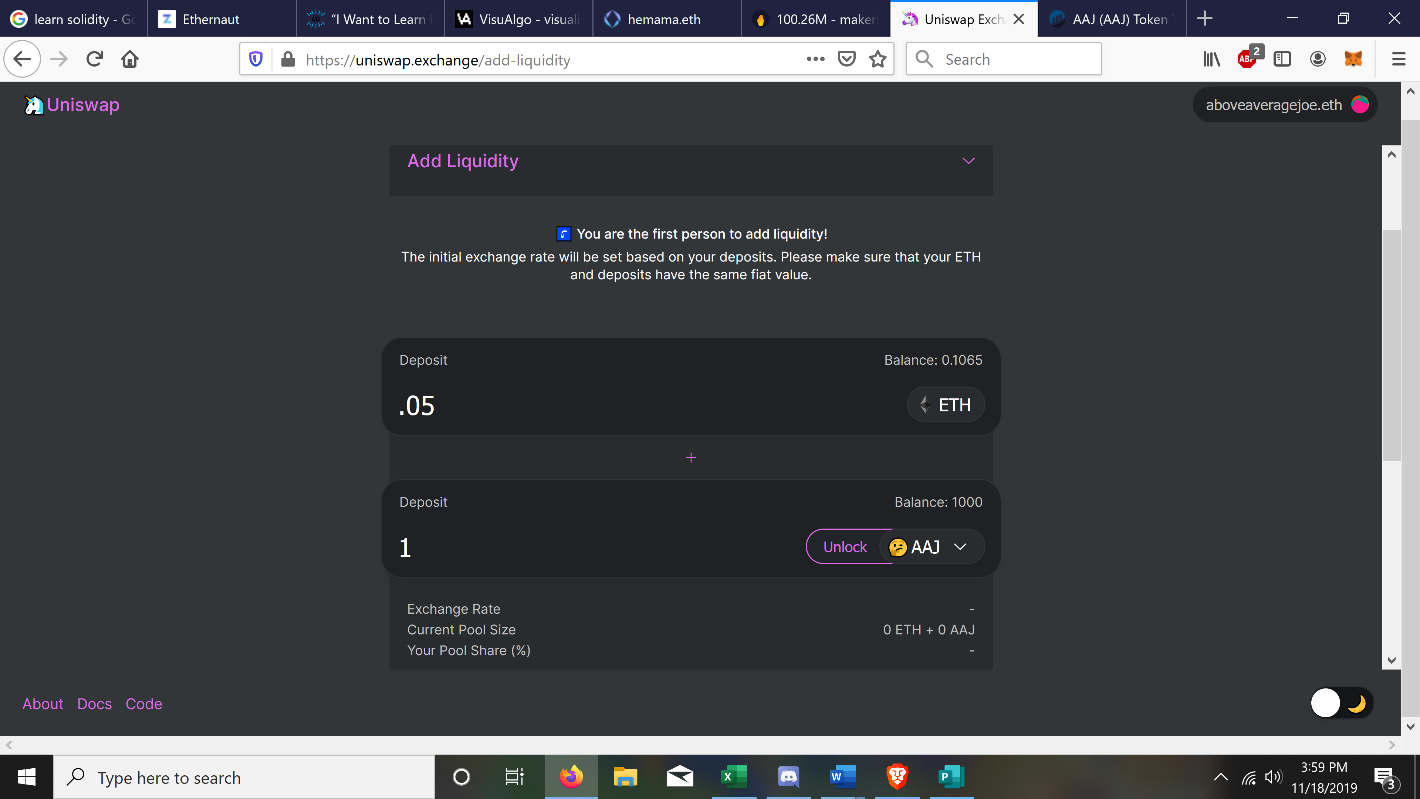
On the new menu, the first column must be ETH as a trading pair, and the second token should be your new personal token. If you cannot find it in the dropdown menu, enter your token contract address in the search bar and it should show up.
Once selected, you will have to unlock your tokens, by clicking “Unlock” and approving another wallet transaction. While it approves on the Ethereum network I’m going to give you something to consider:
Consider how much liquidity to add—this decision requires some thought
If the term “Bonding curve” is new to you, I recommend reading this article by Fernando Martinelli to familiarize yourself with the concept, it will help you make this decision wisely.
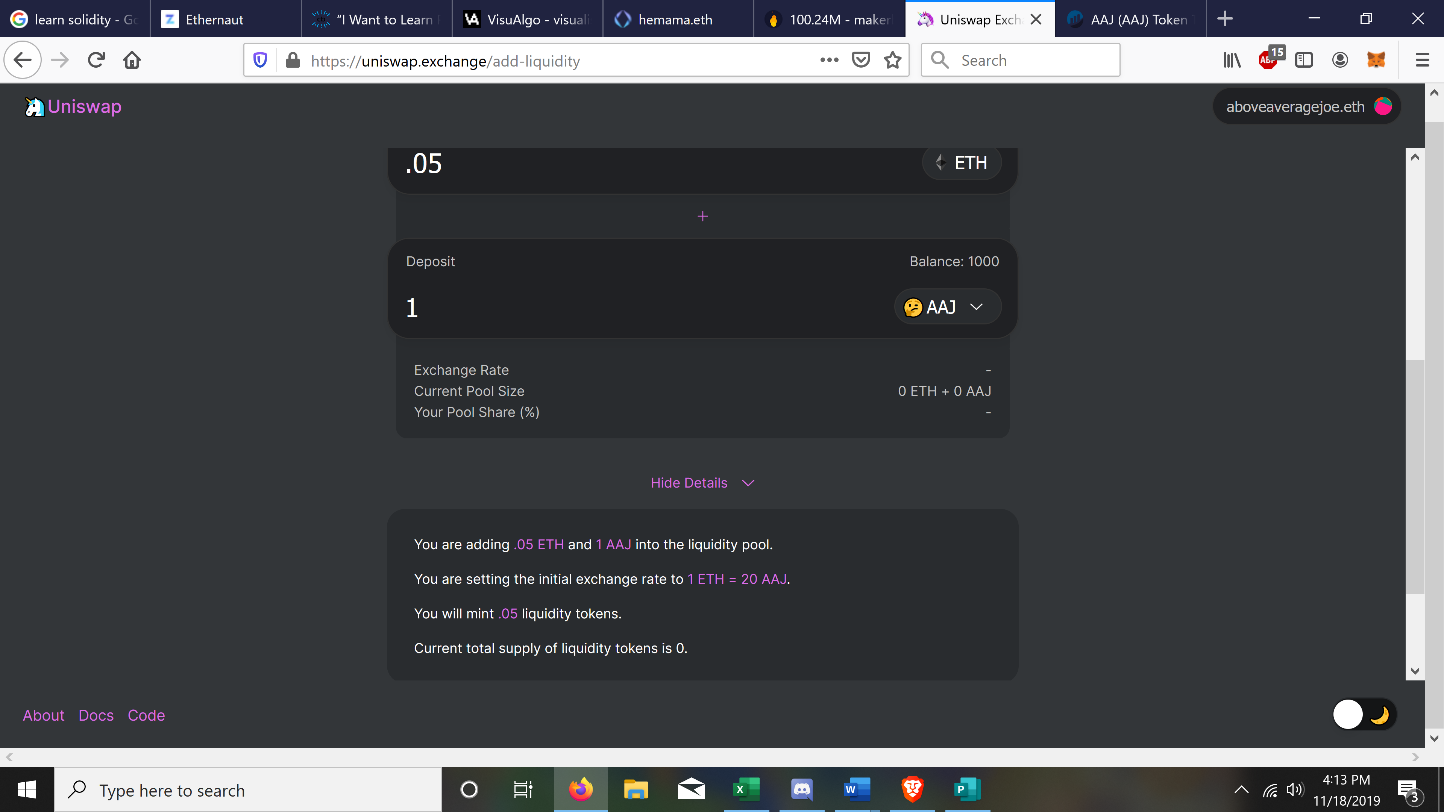
Liquidity provided to the pool determines how steep the bonding curve is. The deeper the pool, the more gradual the curve. Plot the depth of your liquidity accordingly, and after initial release, the market will begin to determine your rates based on demand. Since you own all provided liquidity, you can withdraw all liquidity from the pool to regain access to your funds, and reset the bonding curve with new liquidity after that.
When you set the initial ratio for your exchange it sets your starting point on the bonding curve, so it’s important to make sure the redemptive value of your token is equivalent to its value in ether. The advanced details on the Uniswap page may help provide an easy conversion rate to reference for accuracy.
Once you have determined your desired rate of token exchange and liquidity depth, submit your transaction and approve it in your wallet. Now, all a person has to do to buy your token is enter your token contract address in the Uniswap token search bar, and exchange it for Ether.
Part 4: Redeeming/burning your personal token
Ok, someone’s bought your token—now how do they use it?
Remember that URL for your redeem token? Here’s where that comes in!
Mine is https://app.openlaw.io/template/Redeem AAJ. Yours will be different, based on what you named it. You can offer the direct link, or they can look it up based on the template name in Openlaw.
When they fill out the form and sign it, an email will be sent to the address you provided asking for your signature. After both parties have signed the agreement, the contract must be executed to initiate the token burn, or they will remain in the wallet of the token holder. This execution works just like it did when you initially minted your tokens on Openlaw. The burn can be done immediately after the signatures have showed up on the Rinkeby testnet.
Wrapping up
At this point you should be able to mint your own token, provide liquidity on Uniswap, and burn the token on request. The only limits to the potential of your token are your own creativity and market demand!
RSA note: hire Above Average Joe for one-on-one help setting up your own token. Just buy an AAJ token on Uniswap using contract “0x0dcfd6d0a85cc8f35fe507fed1dba4318bae8df3”
After buying the token it can be redeemed here for 1 hour per token. 🔥
Action steps
- Mint your own personal token
- Setup a way to redeem your token and give it liquidity on Uniswap
- Having trouble? Buy an AAJ token and Above Average Joe can help!
Author Blub
Above Average Joe is one of my favorite crypto natives. He’s an incredible Bankless community member & one of the most enthusiastic doers in this space. Currently Joe volunteers as a community builder for Bankless & DeFiZap. Catch up with him in the Inner Circle or twitter.
Subscribe to the Bankless program. $12 per mo. Includes Inner Circle & Deal Sheet.
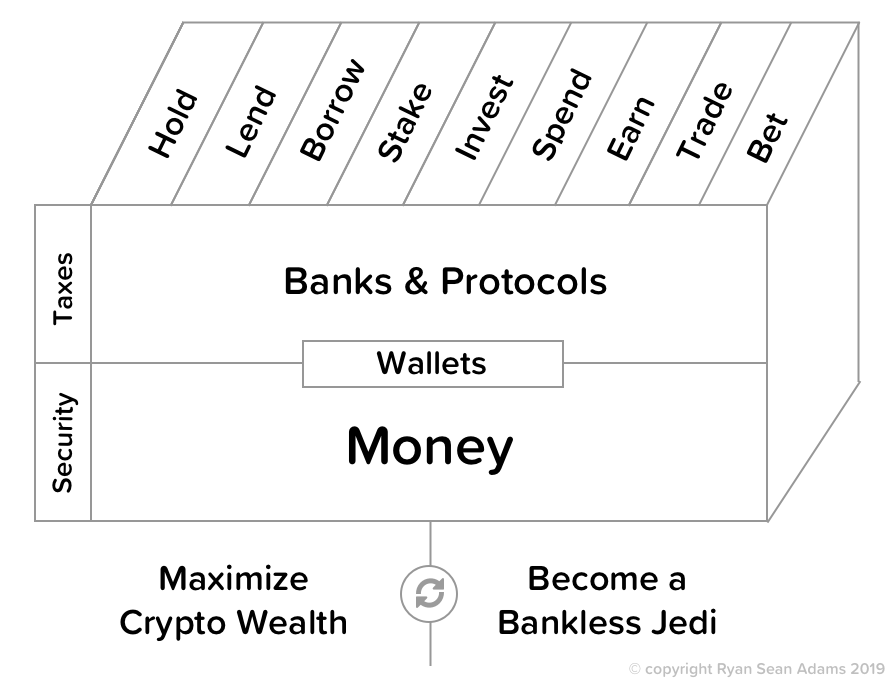
Filling out the skill cube
Creating your own personal token leveled you up on a number of skills—you learned how to mint, trade, and earn in this new money system. Our most ambitious tactic yet!
👉Send us a tip for today’s issue (rsa.eth)
Not financial or tax advice. This newsletter is strictly educational and is not investment advice or a solicitation to buy or sell any assets or to make any financial decisions. This newsletter is not tax advice. Talk to your accountant. Do your own research.
Disclosure. From time-to-time I may add links in this newsletter to products I use. I may receive commission if you make a purchase through one of these links. I’ll always disclose when this is the case.