📒 Guide: Becoming a Validator on the Eth2 Testnet

Last updated: November 4th, 2020
To the Bankless Nation,
The deposit contract is open and Eth2 is set to go live on December 1st, 2020. This is years of work finally coming into fruition. And it’s safe to say we’re excited.
We’re so excited about the launch of Eth2 that we’re relaunching our an all-encompassing guide for those looking to run a validator node. We did this before to help people get setup on Medalla back in August, but now it’s game time.
This is the real deal.
Please join me in thanking Collin Myers & Mara Schmiedt from ConsenSys CodeFi for putting this together—we hope it will serve as an invaluable resource for the Ethereum community on getting started with Eth2. 👏
This is the frontier.
- RSA
🙏Sponsor: Aave—earn high yields on deposits & borrow at the best possible rate!
Here’s what this guide covers:
- Recommended hardware
- Choosing & Installing Your Client
- Setting up an Eth1 Node
- Using the Eth2 Launch Pad
- Bonus content and resources

Bring a friend on the journey! Share this guide with someone. Let’s help the world go bankless!
1. Hardware Requirements
Based on the decentralized design goals of Eth2, it is expected that validators will utilize a variety of different infrastructure setups (on-premise, cloud, etc).
👉 Using a Testnet is a great way to get involved and gives you sufficient time to determine what type of setup gives you the best, most reliable performance. Make sure to run some tests before you get started!
Below you will find some hardware recommendations, resource links, and some useful guides to get you prepared.
Recommended Specs:
- Operating System: 64-bit Linux, Mac OS X, Windows
- Processor: Intel Core i7-4770 or AMD FX-8310 (or better)
- Memory: 8GB RAM
- Storage: 100GB available space SSD
- Internet: Broadband internet connection (10 Mbps)
- Power: Uninterruptible power supply (UPS)
Digital Ocean Equivalent (cloud provider):
Memory: 8GB RAM
Storage: 160GB available space SSD
Uptime: 99.99%
Availability: 8 Data Centers
$/HR: $0.060
$/MO: $40
Hardware Equivalent:
- ZOTAC ZBOX CI662 Nano Silent Passive-Cooled Mini PC 10th Gen Intel Core i7
- SanDisk Ultra 3D NAND 2TB Internal SSD
- Corsair Vengeance Performance SODIMM Memory 16GB (2x8GB)
Minimum Requirements:
- Operating System: 64-bit Linux, Mac OS X, Windows
- Processor: Intel Core i5-760 or AMD FX-8110 (or better)
- Memory: 4GB RAM
- Storage: 20GB available space SSD
- Internet: Broadband internet connection (10 Mbps)
- Power: Uninterruptible power supply (UPS)
Digital Ocean Equivalent:
Memory: 4GB RAM
Storage: 80GB available space SSD
Uptime: 99.99%
Availability: 8 Data Centers
$/HR: $0.030
$/MO: $20
Hardware Equivalent:
- ZOTAC ZBOX CI642 Nano Silent Passive-Cooled Mini PC 10th Gen Intel Core i5
- SanDisk Ultra 3D NAND 2TB Internal SSD
- Corsair Vengeance Performance SODIMM Memory 8GB
2. Choosing & Installing Your Client
The launch of Eth2 features multiple clients, providing validators with the option of using different implementations for running their validator.
As of now, there are 4 client teams with production ready implementations that you can try out:

Client Teams
Prysm by Prysmatic Labs (Discord)
Prysm is a Go implementation of the Ethereum 2.0 protocol with a focus on usability, security, and reliability. Prysm is written in Go and released under a GPL-3.0 license.
Instructions: https://docs.prylabs.network/docs/getting-started/
Lighthouse by Sigma Prime (Discord)
Lighthouse is a Rust implementation of the Eth2.0 client with a heavy focus on speed and security. The team behind it, Sigma Prime, is an information security and software engineering firm. Lighthouse is offered under an Apache 2.0 License.
Instructions: https://lighthouse-book.sigmaprime.io/
Teku by ConsenSys (Discord)
PegaSys Teku is a Java-based Ethereum 2.0 client designed & built to meet institutional needs and security requirements. Teku is Apache 2 licensed and written in Java, a language notable for its maturity & ubiquity.
Nimbus by Status (Discord)
Nimbus is a research project and a client implementation for Ethereum 2.0 designed to perform well on embedded systems and personal mobile devices, including older smartphones with resource-restricted hardware. Nimbus (Apache 2) is written in Nim, a language with Python-like syntax that compiles to C.
Instructions: https://nimbus.team/docs/
Github: https://github.com/status-im/nim-beacon-chain
3. Install an ETH1 Node
Running a validator on Eth2 requires you to run an Eth1 node in order to monitor for 32 ETH validator deposits. There are a variety of options when choosing an Eth1 node, below you will find the tools most commonly used to spin up an Eth1 node.
Self Hosted:
Third Party Hosted:
4. Running an Eth2 Validator on Medalla
Step 1: Get ETH on Goerli Testnet
If you are new to Ethereum, then a major step of participation is getting your fuel to participate. The Eth2 Medalla testnet requires 32 GöETH per validator (just like the real thing, except that you’ll be using Goerli testnet ETH!).
If you need to top up there are some great tools that have been built to make this process easier.
Prysmatic Discord (-request-goerli-eth channel)
The Prysmatic Team has automated this process with a bot
Simply type “!send (your Ethereum address)”
EthStaker Discord (-request-goerli-eth channel)
This bot is run and maintained by Beaconcha.in
Simply type “!goerliEth (your Ethereum address)”
Simply paste your ETH address and select ‘request’
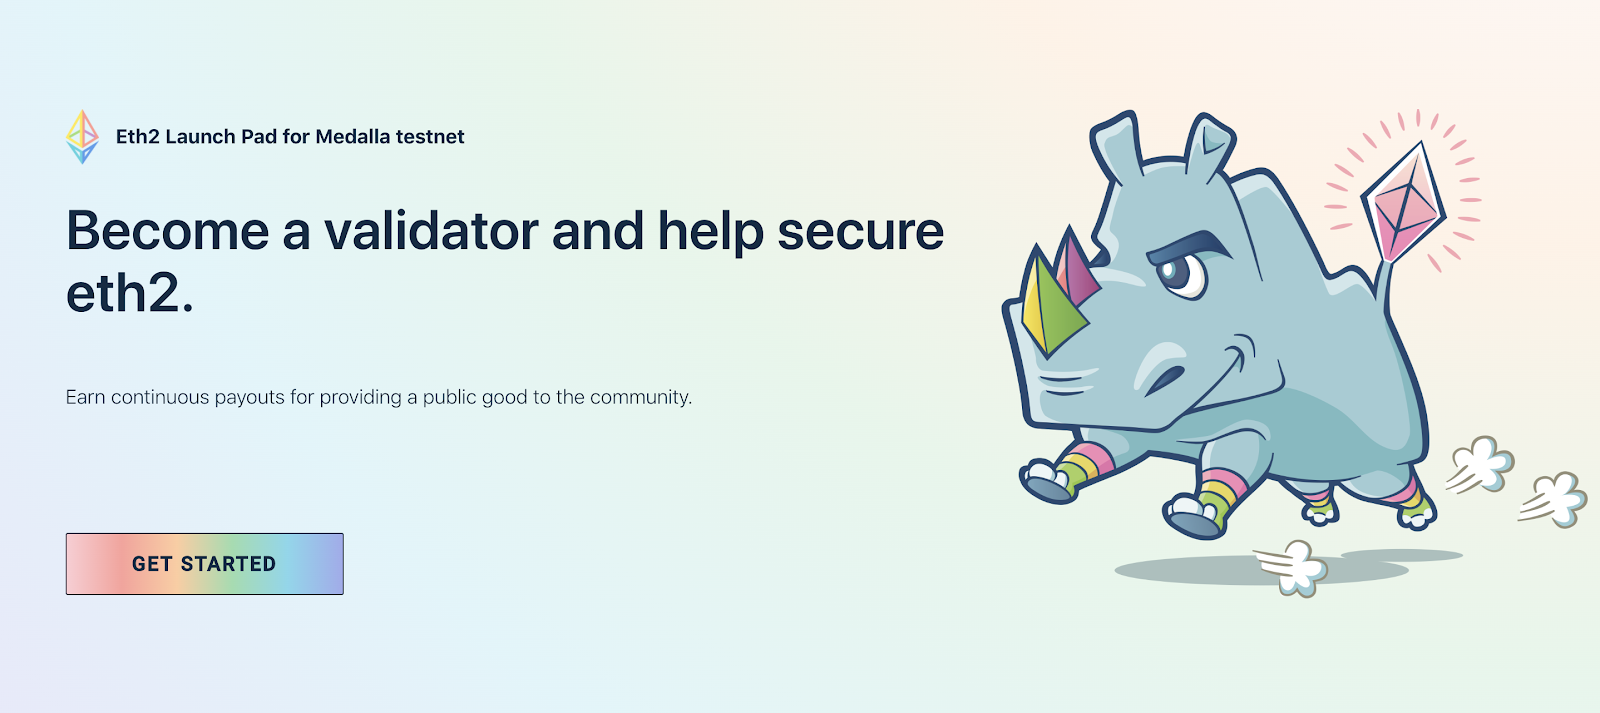
Step 2: Head over to the Eth2 Launchpad
Over the past few months, the Ethereum Foundation (EF), Codefi Activate, and Deep Work Studio have been working on an interface to make it easier for users to stake and become a validator on Ethereum 2.0.
The result of this effort is the Eth2 Launch Pad, an application designed to securely guide you through the process of generating your eth2 key pairs and staking your 32ETH into the official deposit contract on the eth2 testnet and mainnet.
The Launch Pad was designed for at-home validators. These are hobbyists who intend to run their own validator and are comfortable running commands in a terminal screen on their computer.
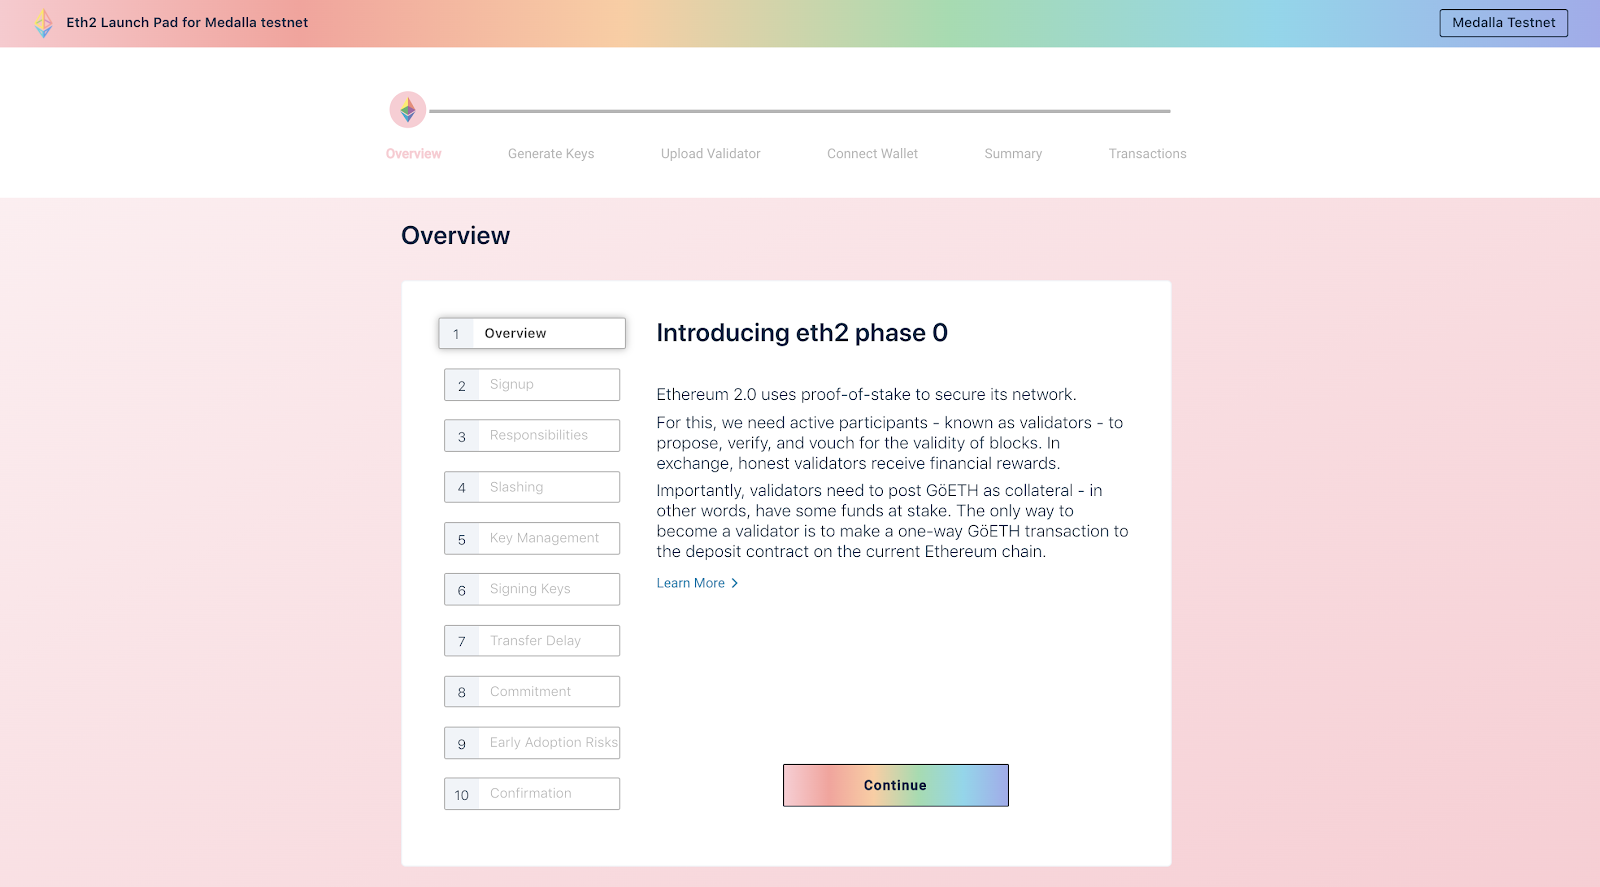
Step 2a: Due Diligence (Overview section)
It is important to take your time and read through the content during this part of the journey. The overview section is designed to be educational and informative about the risks involved when staking your ETH.
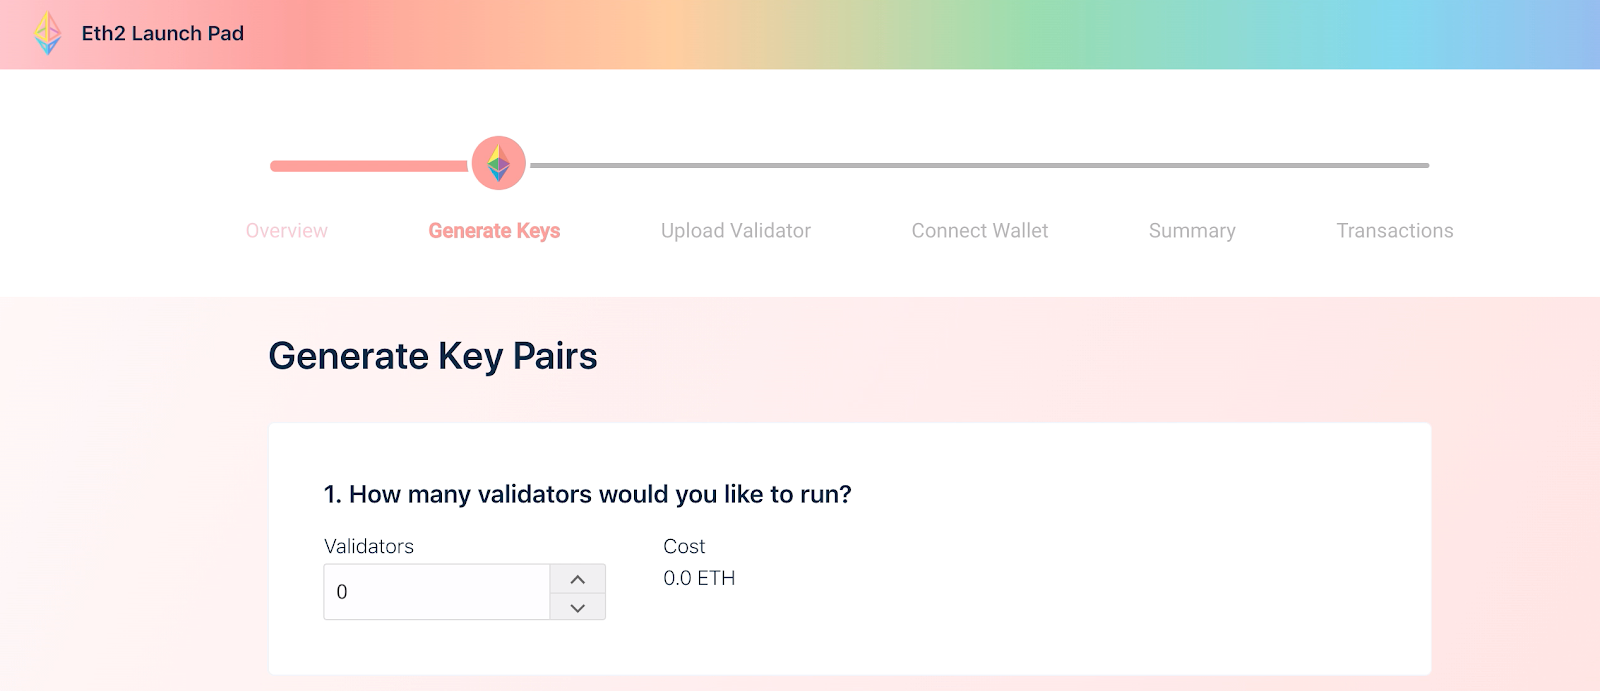
Step 3: Generate your key pairs and mnemonic phrase
For each validator node, you are required to generate your validator key pair and a mnemonic phrase to generate your withdrawal key later on.
As a first step, you are required to select the number of validators you would like to run and on which operating system you would like to run them on.
The Launchpad will provide you with the two options to generate your deposit keys. You can find detailed instructions for your operating system here:
https://github.com/ethereum/eth2.0-deposit-cli/blob/master/README.md
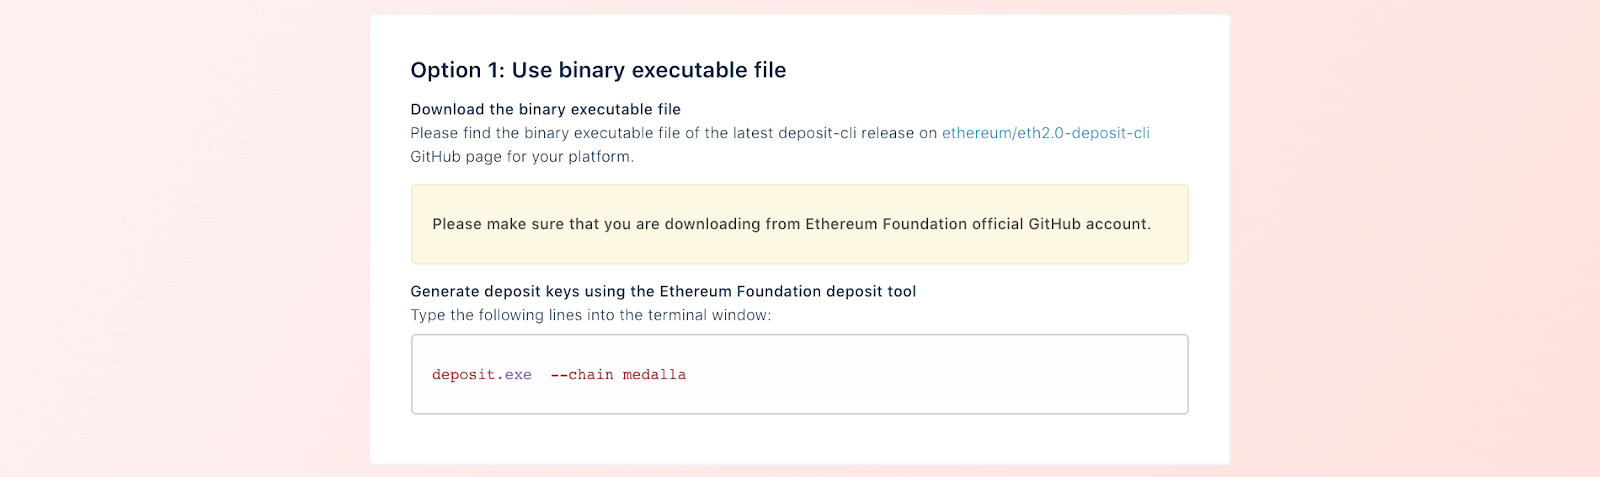
The first is to use the binary executable file that you can download from the ethereum/eth2.0-deposit-cli page and then run the ./deposit command in your terminal window.
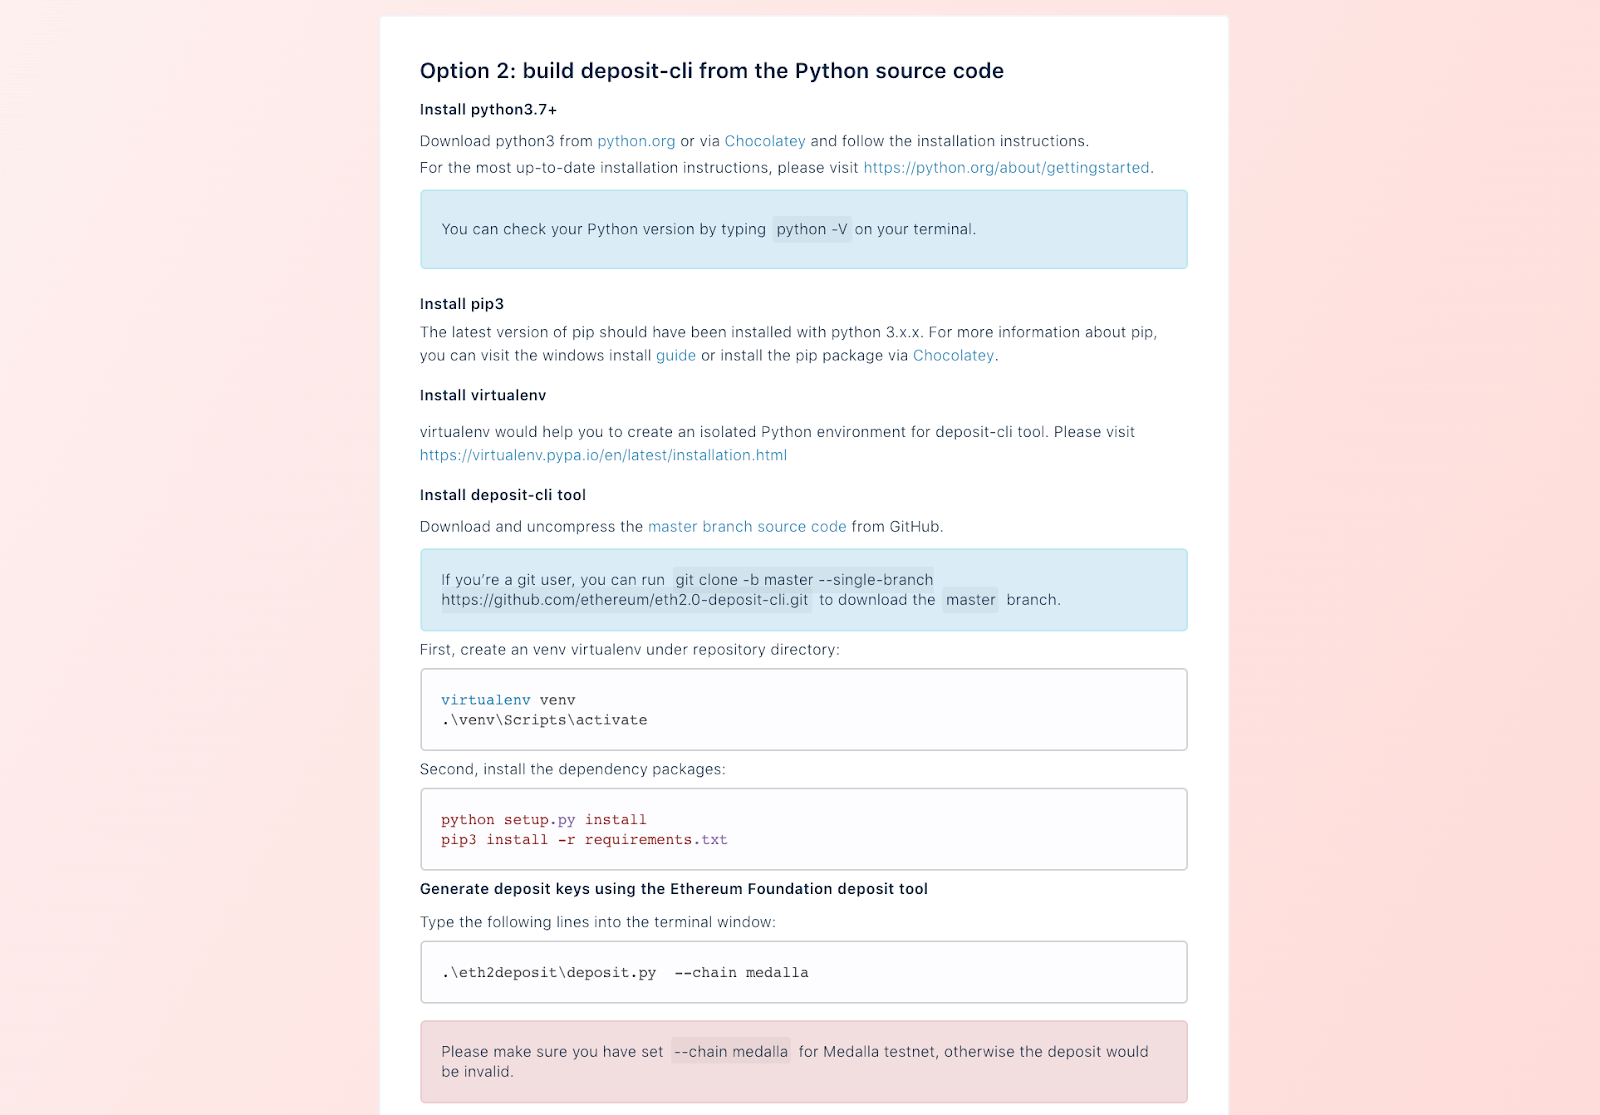
The other option is to build the deposit-CLI tool from the Python source code. You will need to follow the instructions to ensure you have all the required development libraries and the deposit-CLI tool installed.
Once completed, run the .\eth2deposit\deposit.py command in your terminal window.
Once you have installed the deposit-CLI tool and run it in your terminal window, you will be prompted to:
- specify the number of validators you would like to run
- the language in which you would like to generate your mnemonic phrase
- specify the testnet on which you would like to run your validator.
Please select Medalla for the purpose of this Testnet tutorial.
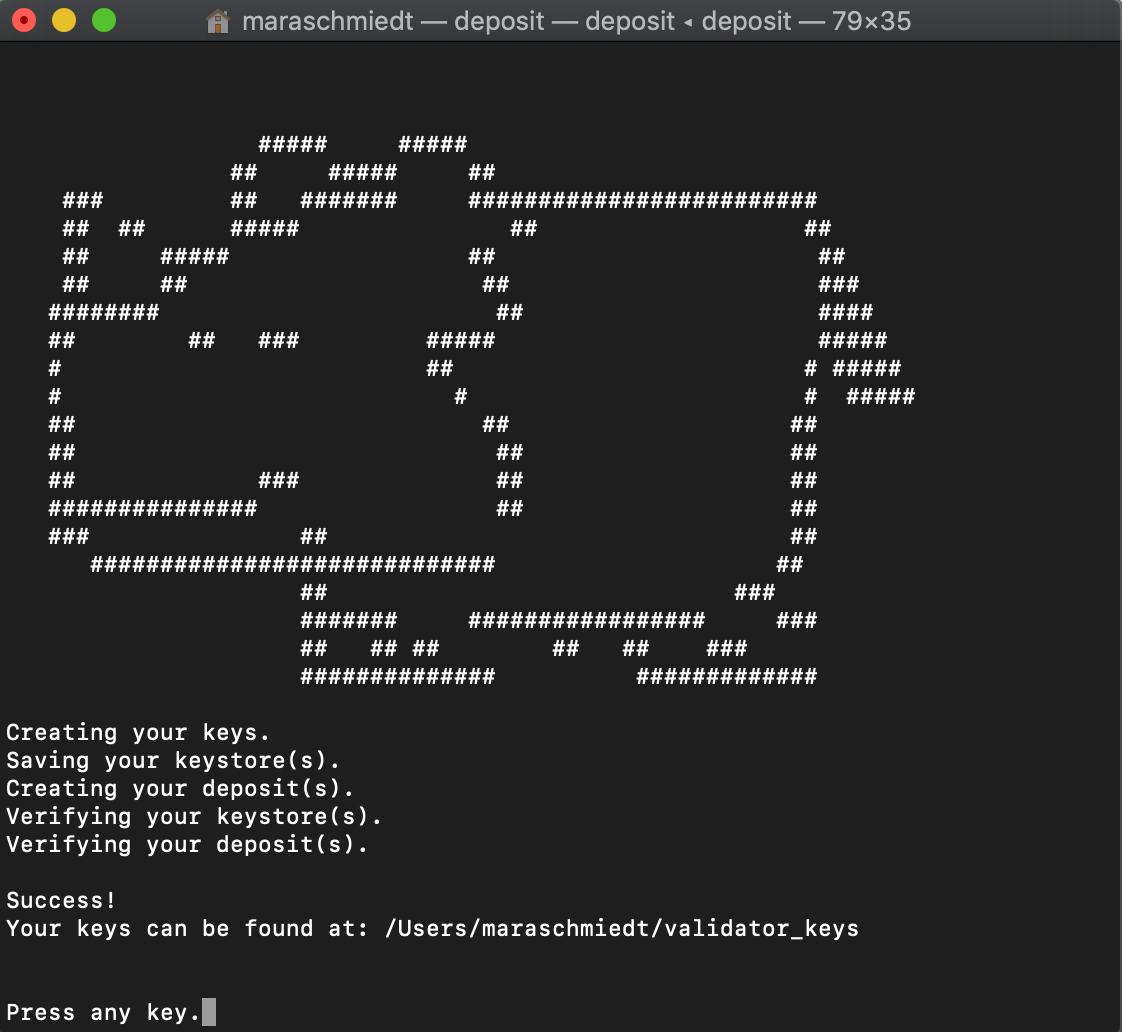
Now you will be asked to set your password and once confirmed your mnemonic phrase will be generated. Make sure you have it written down in a safe place and stored offline.
If you have successfully completed this step you should see the screen below.
If you have questions about the deposit-cli, please visit the GitHub repository:
https://github.com/ethereum/eth2.0-deposit-cli
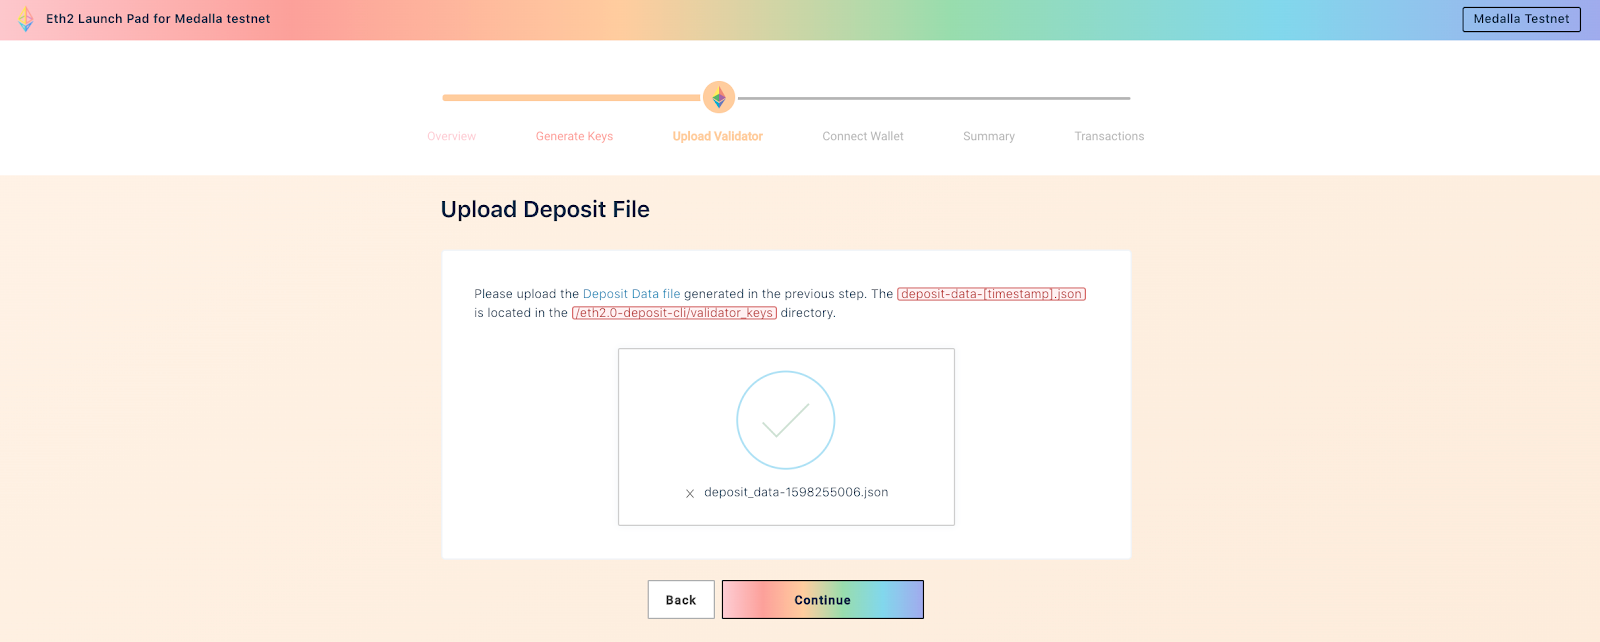
Step 4: Upload your deposit file
You are almost there! As a next step upload the deposit json file you generated in the previous step.
It is located in the /eth2.0-deposit-cli/validator_keys directory and is titled deposit-data-[timestamp].json.
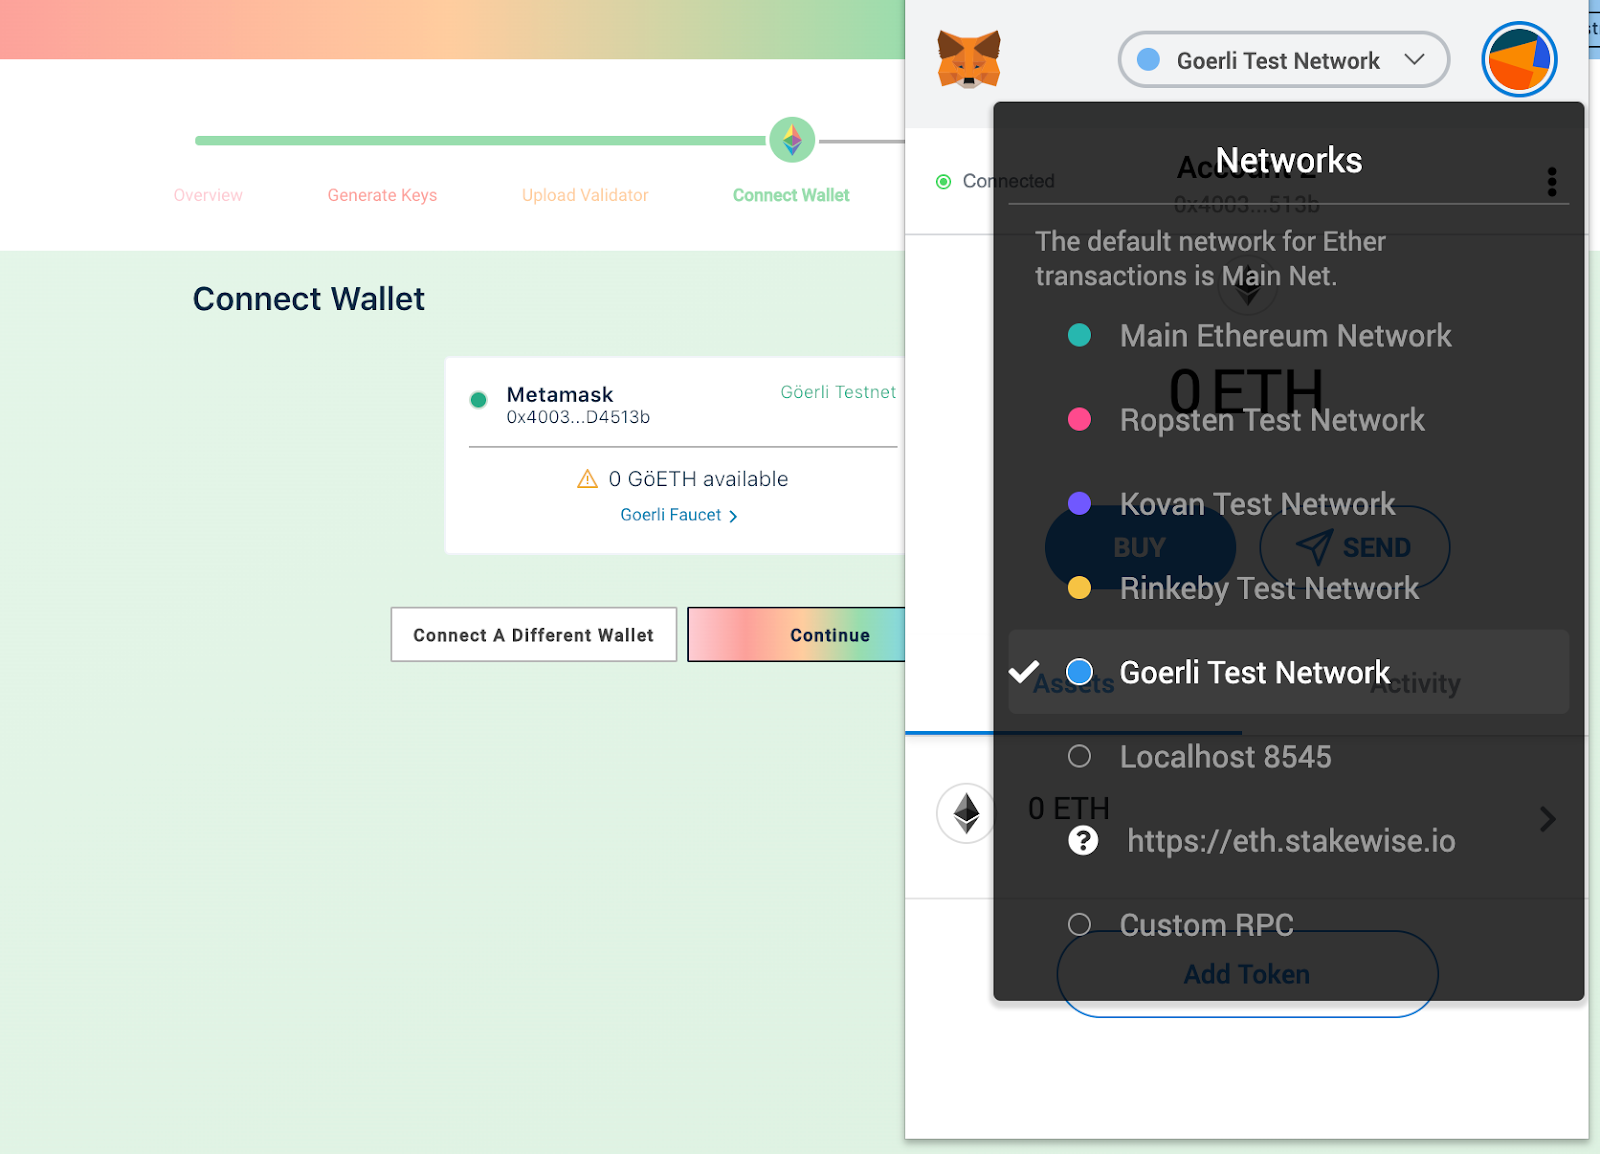
Step 5: Connect your wallet
Next connect your Web3 wallet and click continue. Make sure you select the Goerli testnet in your wallet settings.
⚠️ Do not send real ETH to the Medalla testnet deposit contract. ⚠️

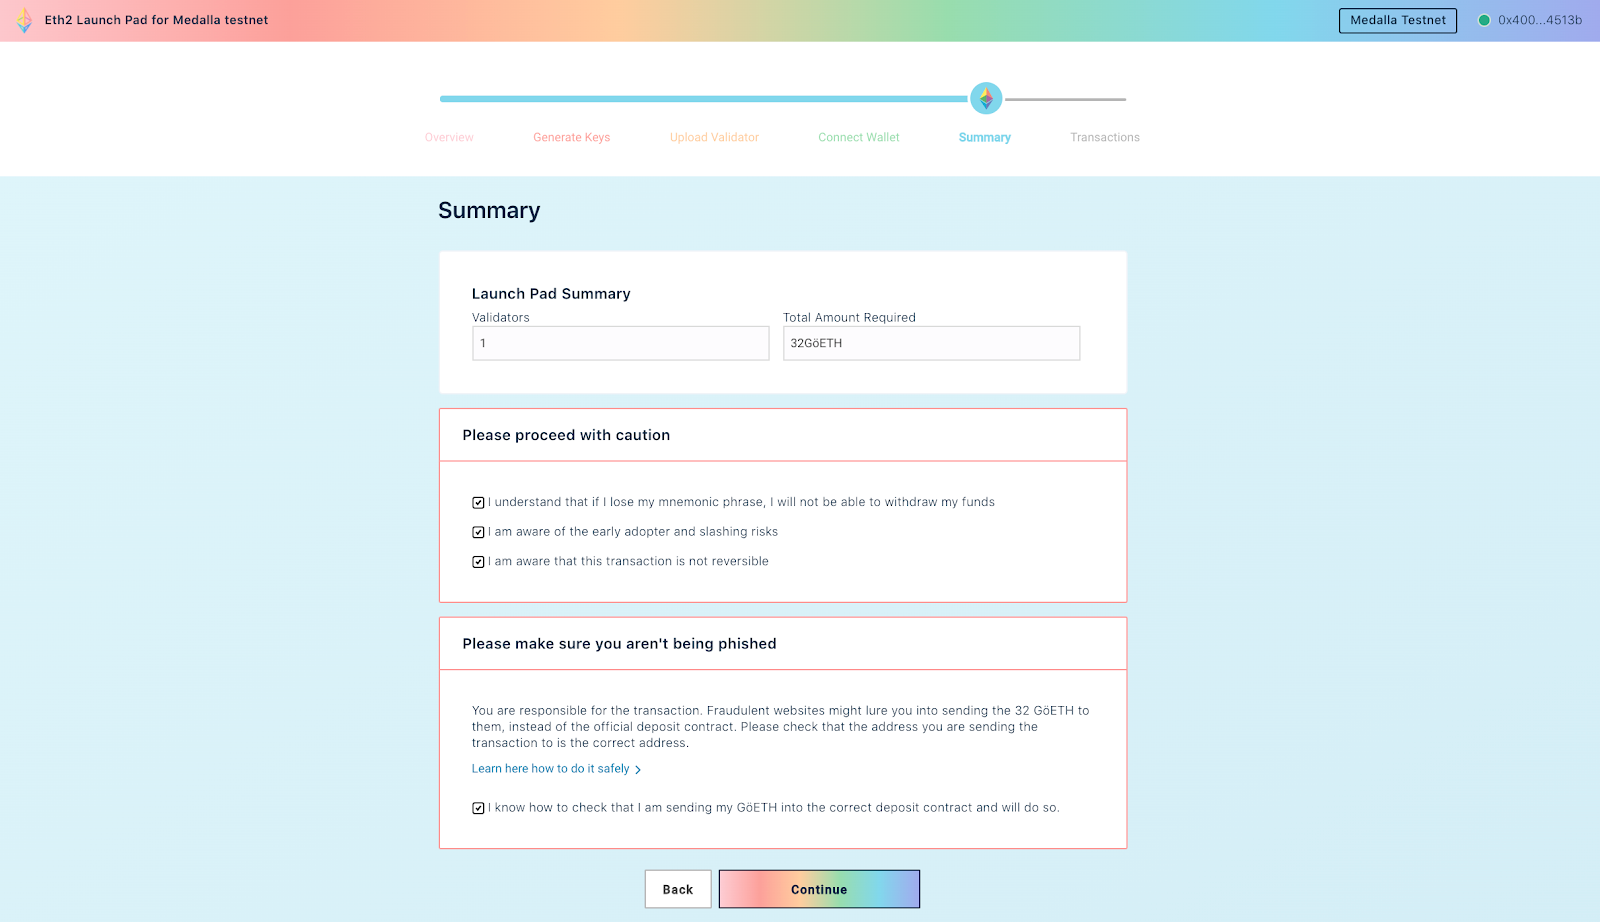
Step 6: Confirm transaction summary & initiate deposit
Once you have connected and confirmed your wallet address you will be taken to a summary page that displays the total amount of GoETH required to send to the deposit contract based on the number of validators you have selected to run.
Consent to the alert checks and click confirm to navigate to the final step - the actual deposit.
Click ‘Initiate the Transaction’ to deposit your GoETH into the official Medalla testnet contract.
You will be required to confirm the 32 GoETH deposit per validator through your wallet. Once your transaction is confirmed ….Boom! You’ve made it and can call yourself an official staker on the most monumental Web3 Testnet out there!
6. Bonus Content & Resources
After reviewing the above steps we recommend that to be validators look through the client specific guides below before getting the process kicked off. The above steps will follow different orders of operations based on which client you decide to work with.
The below guides are the most in depth we have seen in the industry so far and will take Bankless readers through the nuances of the process.
Bonus Resources for Eth2 Validators
These are highly recommended once you make your decision about which client you would like to use:
Eth2 Block Explorers:
Infrastructure/Hardware
CoinCashew Series:
- How to stake on ETH2 Medalla Testnet with Prysm on Ubuntu
- How to stake on ETH2 Medalla Testnet with Lighthouse on Ubuntu
- How to stake on ETH2 Medalla Testnet with Teku on Ubuntu
- How to stake on ETH2 Medalla Testnet with Nimbus on Ubuntu
Somer Esat Guides:
- Guide to Staking on Ethereum 2.0 (Ubuntu/Medalla/Lighthouse)
- Guide to Staking on Ethereum 2.0 (Ubuntu/Medalla/Prysm)
Stay on Top of Eth2 Developments:
- What's New in Eth2 (Ben Edgington)
- Ethereum Blog (Danny Ryan's Quick Updates)
- Ben Edgington (Annotated Eth2 Spec)
- Jim Mcdonald (Attestant Posts)
It’s all about the Keys Keys Keys:
Earn some POAPs to compliment your Bankless POAP. Run different clients and collect the set.
More guides!
- Guide 1: Starting with Bankless
- Guide 2: Using the Bankless Badge
- Guide 3: Tactics and Tools
- Special Guide: Becoming a Validator on the Eth2 Testnet (👈you are here)
🙏Thanks to our sponsor
Aave
Aave is an open source and non-custodial protocol for money market creation. Originally launched with the Aave Market, it now supports Uniswap and TokenSet markets and enables users and developers to earn interest and leverage their assets. Aave also pioneered Flash Loans, an innovative DeFi building block for developers to build self-liquidations, collateral swaps, and more. Check it out here.
Not financial or tax advice. This newsletter is strictly educational and is not investment advice or a solicitation to buy or sell any assets or to make any financial decisions. This newsletter is not tax advice. Talk to your accountant. Do your own research.
Disclosure. From time-to-time I may add links in this newsletter to products I use. I may receive commission if you make a purchase through one of these links. I’ll always disclose when this is the case.